Your backyard deserves better than a rusty freestanding grill sitting alone on the patio. An outdoor grill island turns your cooking space into a real entertaining hub the kind neighbors actually talk about. I’ve helped dozens of US homeowners design backyards they genuinely love spending time in, and a well-built outdoor kitchen island is almost always the centerpiece. Whether you’re working with a sprawling Texas backyard or a cozy suburban patio in Ohio, there’s a grill island style that fits your space, your budget, and your lifestyle. Let’s get into it.
My Design Notes
When I was working on a backyard renovation project in Austin, Texas, a homeowner came to me completely frustrated. Two freestanding grills had rusted out in back to back seasons, and she was done throwing money at the problem. Her budget was $18,000, her patio was mid-sized, and her two golden retrievers basically lived outside year round. We designed an L-shaped stone faced outdoor grill island with a concrete countertop, a built-in Weber grill, a mini fridge underneath, and bar seating for four people. I almost specified white quartz for the counters and honestly, that would have been a mistake. The Texas heat alone is brutal on lighter surfaces, and with two dogs? Forget it. We switched to honed concrete sealed with a penetrating sealer, and when I checked in two years later, it still looked sharp. That project reminded me that the best outdoor grill island is not the prettiest one in the showroom. It is the one built around how you actually live.
Stunning Outdoor Grill Island Designs That Turn Any Backyard Into the Ultimate Cooking and Entertaining Space
1. Why Every Backyard Needs a Proper Outdoor Grill Island (Not Just a Loose Grill)
I get it a freestanding grill feels like enough. You fire it up on weekends, cook some burgers, and call it a day. But here’s what I’ve seen happen to nearly every homeowner who goes that route: two seasons in, the grill is rusting, there’s nowhere to set down a plate, and the whole setup looks like an afterthought. A proper outdoor grill island changes everything. It gives you counter space, storage, a place for guests to pull up a stool, and a cooking zone that actually functions like a kitchen. It also adds real value to your home. According to several appraisers I’ve spoken with across the Sunbelt states, a well-built outdoor kitchen island can add anywhere from $10,000 to $20,000 to a home’s resale value depending on the market.
One thing I always tell my clients is this think of your outdoor grill island the way you’d think about your indoor kitchen. You wouldn’t cook inside without counter space, a trash spot, or cabinet storage. Why settle for less outside?
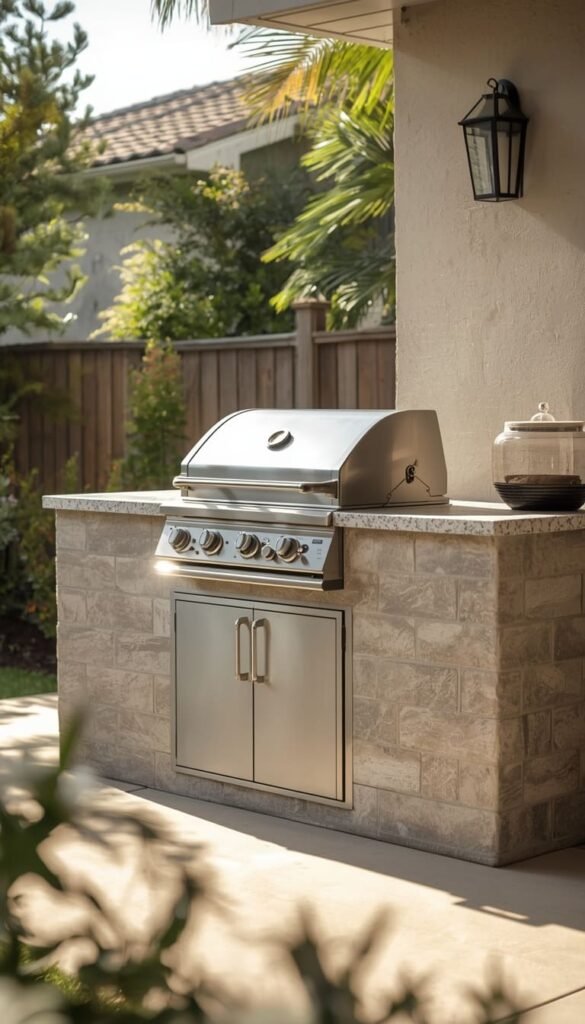
2. Classic Stone Outdoor Grill Island Timeless and Built to Last
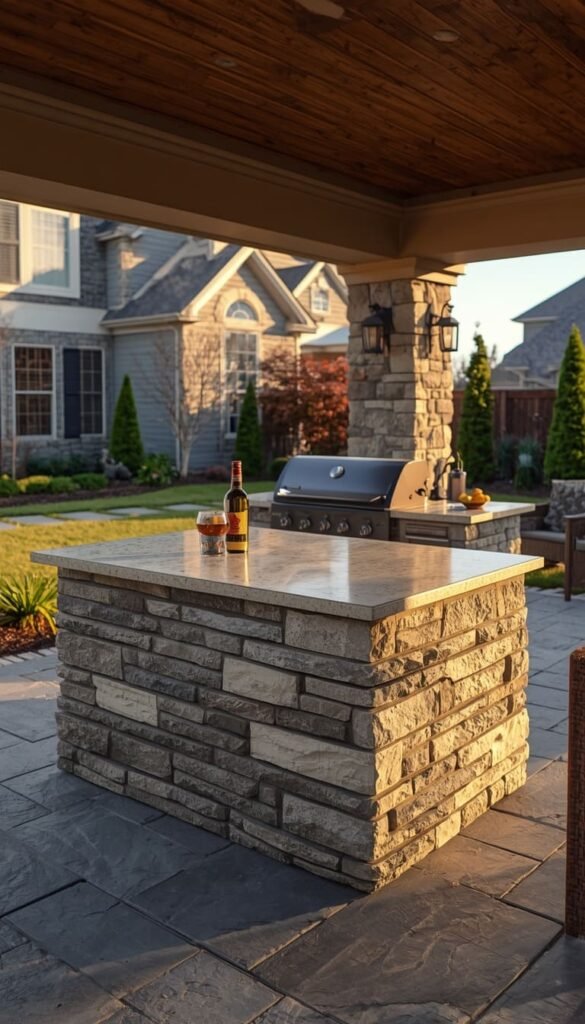
If you want something that looks like it has always belonged in your backyard, a stone outdoor grill island is where I’d point you first. Natural stone like stacked slate, limestone, or river rock gives your cooking area that grounded, permanent feel that no prefab kit can replicate. I’ve designed stone islands for clients in the Carolinas and the Southwest, and they age beautifully the weathering actually adds character over time rather than making things look worn out.
The tradeoff is cost and time. Natural stone work is labor intensive, and you’re looking at a higher price point than concrete block or stucco finishes. A few things worth knowing before you commit:
- Seal your stone countertop every one to two years to prevent grease absorption and staining
- Avoid using acidic cleaners — they break down the stone surface faster than anything
- In freeze-thaw climates like the Midwest or Northeast, make sure your contractor uses frost-resistant mortar
The investment is absolutely worth it if you’re planning to stay in your home long term. This is the kind of outdoor grill island that becomes a permanent feature of your property.
3. Modern Outdoor Grill Island with Sleek Concrete Countertops
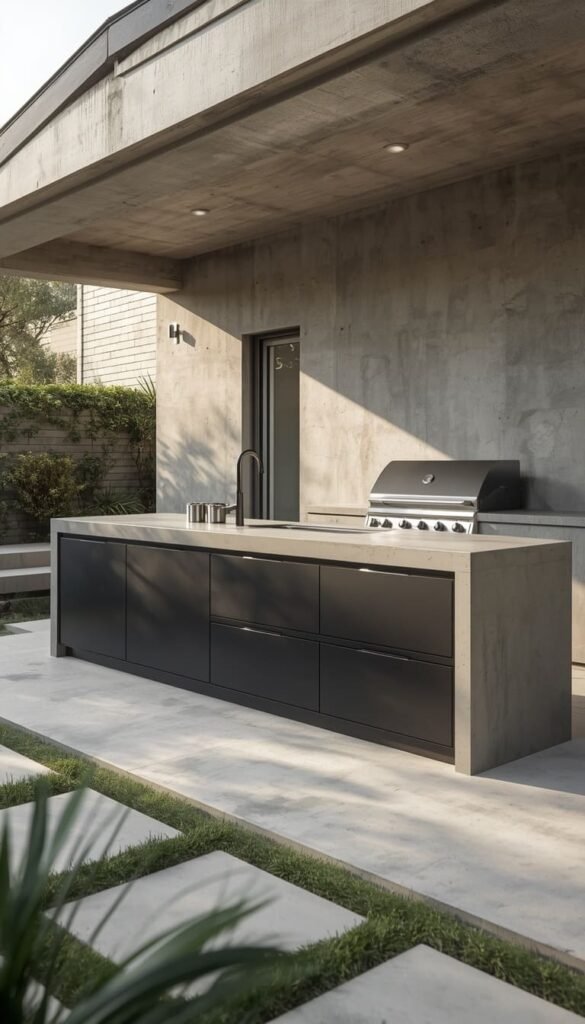
Clean lines, a neutral palette, and surfaces that mean business — that’s what a modern outdoor grill island delivers. Concrete countertops are having a real moment right now in American backyard design, and honestly, I think they deserve every bit of the attention. They’re incredibly durable, can be custom poured into any shape or size, and take on a beautiful patina over time that makes each one genuinely one of a kind.
A quick trick I’ve learned from working with concrete fabricators is to always go with a penetrating sealer rather than a topical one for outdoor use. Topical sealers peel and chip when exposed to UV rays and temperature swings. A penetrating sealer soaks into the material and protects from within, which means it holds up through hot Texas summers and cold Colorado winters alike. Pair the concrete counters with flat-panel stainless steel cabinet doors and a matte black built-in grill, and you’ve got a backyard cooking station that looks like it belongs in an architectural magazine.
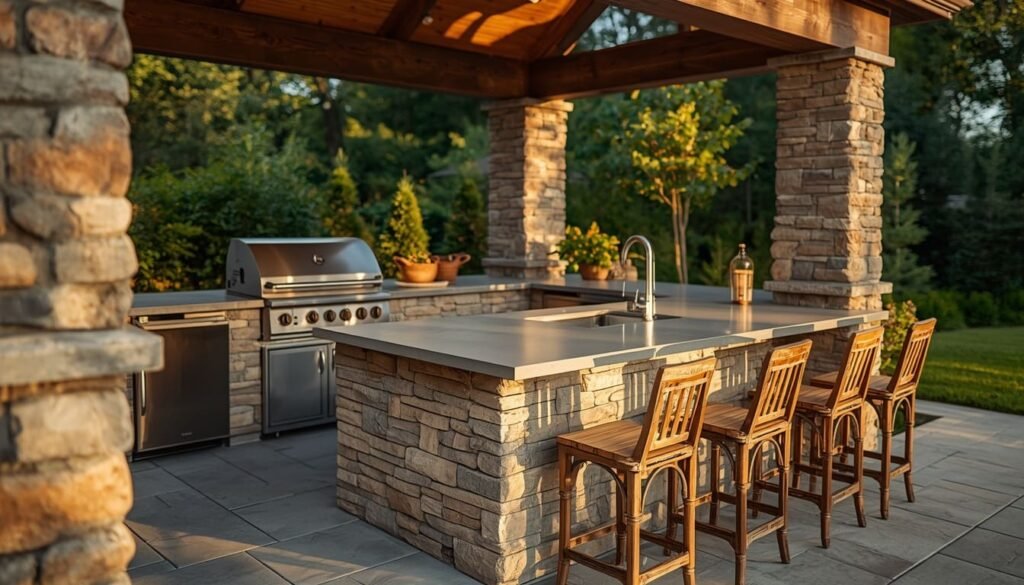
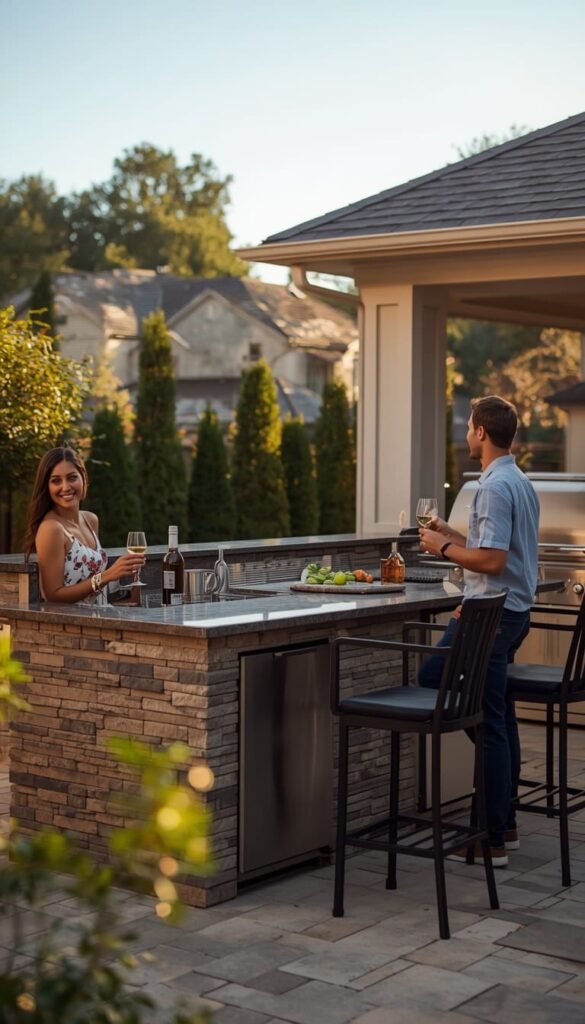
4. Built In Outdoor Grill Island with Bar Style Seating
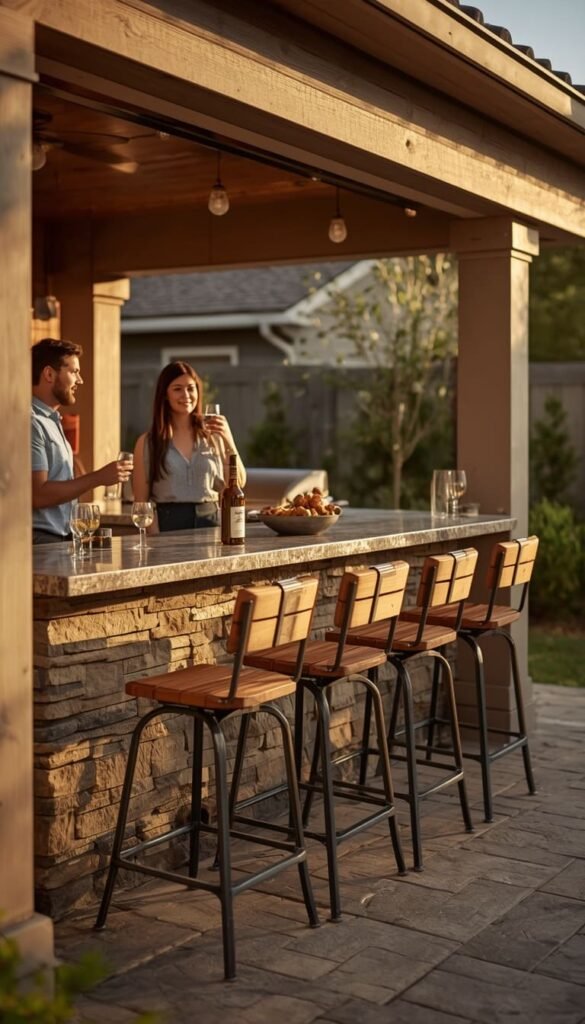
This is hands down one of the most requested layouts I work with, and it makes complete sense. When you add bar style seating to your outdoor grill island, you stop cooking alone. Guests pull up, drinks get poured, and the person at the grill is suddenly part of the conversation instead of standing ten feet away flipping burgers in isolation. It changes the entire social energy of your backyard.
The key to making this layout work is counter height and overhang. You want at least a 12 inch overhang on the seating side so guests have actual knee clearance, and the counter should sit at standard bar height which is 42 inches. A few design details that make a big difference:
- Choose stools with footrests — it sounds minor but after an hour of sitting, your guests will thank you
- Use a slightly darker countertop on the seating side to hide drink rings and casual wear
- If your island runs parallel to the grill, position seating so guests are facing the cook, not the back of the structure
I’ve seen this setup work beautifully in backyards as small as 400 square feet. You don’t need a massive space you just need a smart layout.
Top 6 Outdoor Grill Island Ideas:
| Idea | Estimated Price | Maintenance |
|---|---|---|
| Classic Stone Outdoor Grill Island | $8,000 to $20,000 | Medium |
| Modern Concrete Countertop Island | $6,000 to $15,000 | Low |
| Built In Island with Bar Seating | $7,000 to $18,000 | Low |
| DIY Outdoor Grill Island | $1,000 to $2,200 | Medium |
| Luxury Island with Pizza Oven | $15,000 to $40,000 | High |
| Custom Island with Fridge and Sink | $10,000 to $25,000 | Medium |
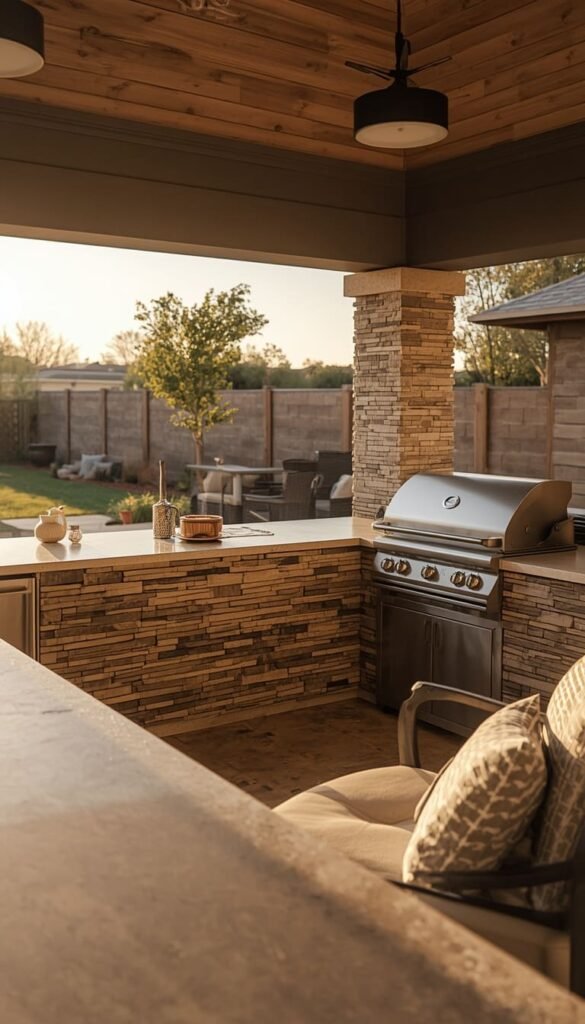
5. Rustic Wood Framed Outdoor Kitchen Island for Farmhouse Lovers
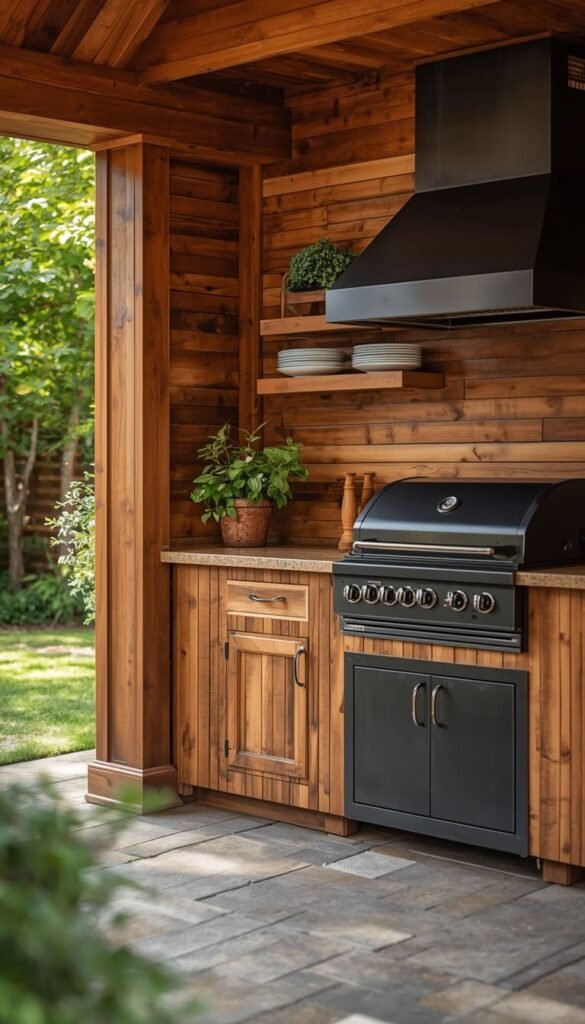
If your home leans toward that warm, lived-in Modern Farmhouse aesthetic, a wood framed outdoor kitchen island is going to feel like a natural extension of your interior style. Think rough-sawn cedar, reclaimed barn wood accents, or even shiplap style panels on the island base. Paired with a matte black grill and simple open shelving, this look is cozy, unpretentious, and genuinely inviting.
Now here’s the honest part and I always make sure my clients hear this before they fall in love with the Pinterest version. Wood requires maintenance outdoors. Full stop. You’ll need to seal or stain it every one to two years depending on your climate, and in humid states like Florida or Louisiana, you’ll want to be especially vigilant about moisture getting into the frame. The smart move is to use cedar or teak for the visible wood elements since both naturally resist rot and insects, while building the actual structural base out of concrete block or steel stud. You get the look without sacrificing the longevity.
6. Compact Patio Grill Island Ideas for Small Backyards
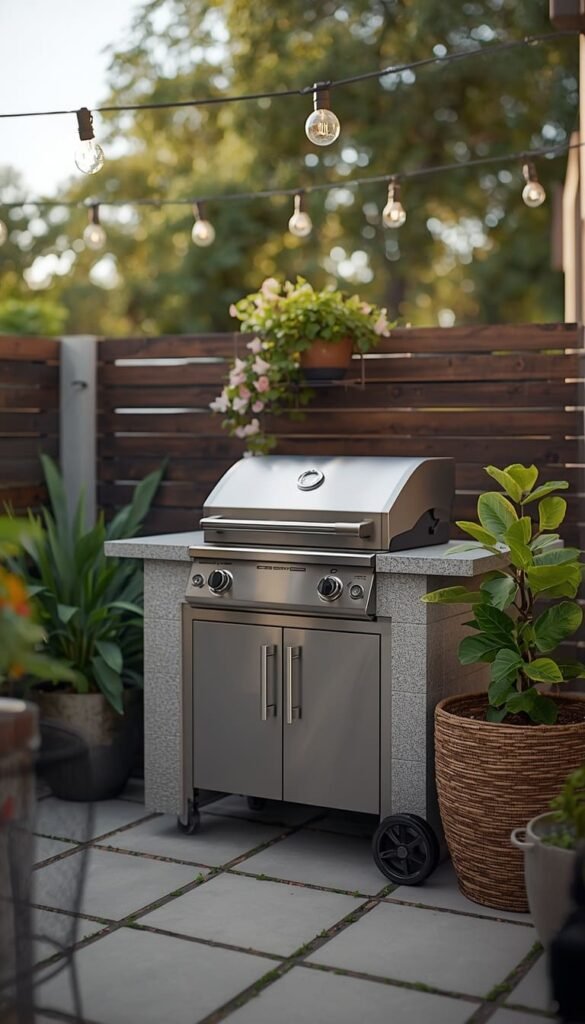
Not everyone is working with a half acre lot, and that’s completely fine. Some of my favorite outdoor grill island projects have been in tight urban backyards in cities like Chicago, Denver, and Charlotte where space is genuinely limited. The secret is designing vertically and keeping the footprint focused.
A compact outdoor grill island that measures just 8 feet by 3 feet can still include:
- A built-in two burner grill or a single high-performance kamado style cooker
- Two to three feet of prep counter space on one side
- Underneath cabinet storage for propane, tools, and supplies
What I always tell homeowners working with smaller patios is to resist the urge to cram everything in. One well-designed, properly sized outdoor grill island will serve you better than an oversized one that leaves no room to actually move around and enjoy the space.
Which outdoor grill island style caught your eye first the classic stone look or something more modern and sleek?
7. Luxury Outdoor Kitchen Island with Pizza Oven Combo
If you really want to make a statement, combining a built-in grill with a wood fired or gas pizza oven is the move. I’ve designed a handful of these across Southern California and the Nashville area, and every single client tells me it becomes the centerpiece of every gathering. There is something about a pizza oven that draws people in it creates a natural gathering point and adds a restaurant quality feel to your backyard entertaining space.
The layout I recommend most often is placing the pizza oven at the end of an L-shaped island with the grill running along the main counter. This keeps intense heat sources separated and gives the cook plenty of working room between stations. One thing to watch out for is ventilation a wood fired oven produces serious smoke, and if your outdoor kitchen is under a pergola or covered structure, you’ll need a proper exhaust hood rated for outdoor use. Skipping this step is the number one mistake I see on luxury outdoor kitchen projects, and it’s an expensive fix after the fact.
8. DIY Outdoor Grill Island on a Budget What Actually Works
Let me be straight with you here because a lot of DIY outdoor grill island content online sets people up for failure. The projects that look amazing and hold up over time share a few things in common and they’re not always the ones with the most views on YouTube.
The most successful budget builds I’ve seen use concrete block as the structural base. It’s inexpensive, widely available at any Home Depot or Lowe’s across the country, and incredibly durable outdoors. From there, homeowners finish the exterior with stucco, tile, or stone veneer to get the look they want. Here’s a realistic budget breakdown for a DIY approach:
- Concrete block base and mortar — $200 to $400 depending on island size
- Stucco or stone veneer finish — $300 to $600
- Drop-in grill insert — $300 to $800 for a solid mid-range option
- Concrete or tile countertop — $150 to $400
Total? You can have a genuinely good looking, structurally sound outdoor grill island for $1,000 to $2,200 if you’re willing to put in the weekend work. The mistake most DIYers make is rushing the base take your time on the block laying and leveling, because everything built on top of it depends on that foundation being solid.
9. L Shaped Outdoor Barbecue Island for Maximum Counter Space
If you love to cook and you entertain regularly, an L-shaped outdoor barbecue island is genuinely one of the smartest layouts you can choose. It gives you two distinct working zones one side for active grilling and one side for prep, plating, and drinks. I’ve found that this configuration works especially well when one leg of the L faces the seating area, so guests feel connected to the action without crowding the cook.
The L-shape also solves a problem I see constantly in linear island designs you run out of counter space right when you need it most. When you’re pulling ribs off the grill, trying to slice brisket, and keeping side dishes warm all at the same time, that extra counter real estate on the second leg becomes absolutely essential. For sizing, I typically recommend a minimum of 8 feet on the main grill side and at least 5 feet on the return leg. That gives you enough room to work comfortably without the island overwhelming your patio.
One thing worth planning early is traffic flow. Leave at least 42 to 48 inches of clearance on all open sides of the island so people can move around naturally during a gathering. It sounds like a small detail but it makes a massive difference when you have twelve people in the backyard on a Saturday afternoon.
10. Covered Outdoor Kitchen Island Rain or Shine Grilling
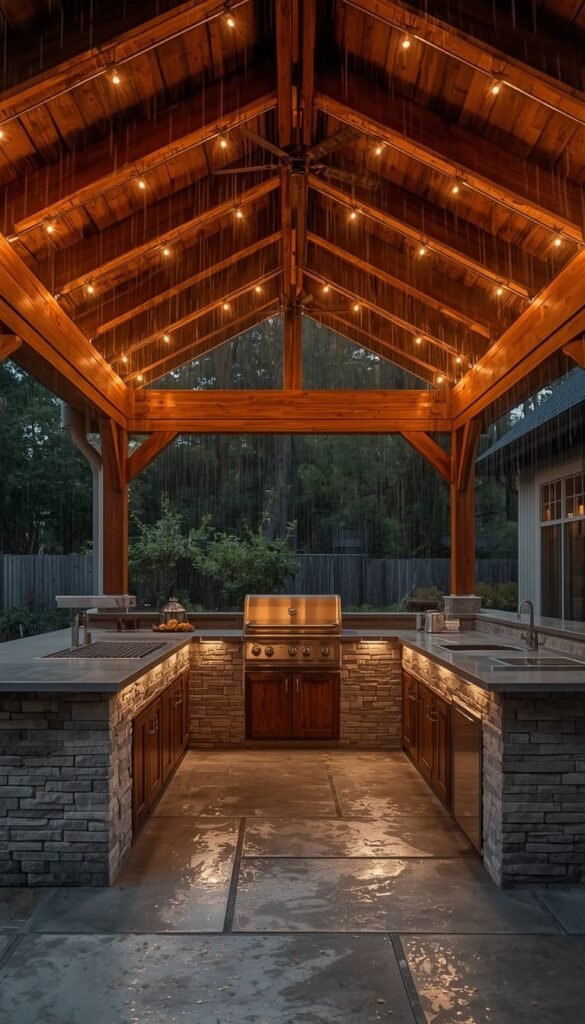
Here in the US, weather is unpredictable almost everywhere. It rains in Atlanta with zero warning. Afternoon thunderstorms roll through Florida like clockwork in the summer. And if you’ve ever had a cookout shut down by a sudden downpour, you already know exactly why a covered outdoor kitchen island is worth every penny of the investment.
A well-designed cover does more than keep the rain off. It defines the outdoor cooking space architecturally, creates a sense of enclosure that makes the area feel like a true outdoor room, and protects your appliances and countertops from UV damage year round. The most popular options I work with are:
- Attached pergolas with a polycarbonate or metal roof panel insert
- Full solid roof extensions tied into the home’s existing roofline
- Freestanding pavilion structures for backyards where attachment to the house isn’t practical
One thing I always flag for clients going the covered route check your local building codes before construction begins. In many US counties, a covered outdoor kitchen that exceeds a certain square footage requires a permit. It varies by municipality, but getting caught without one during a home sale is a headache nobody needs.
11. Stainless Steel Outdoor Grill Island for a Pro Kitchen Look
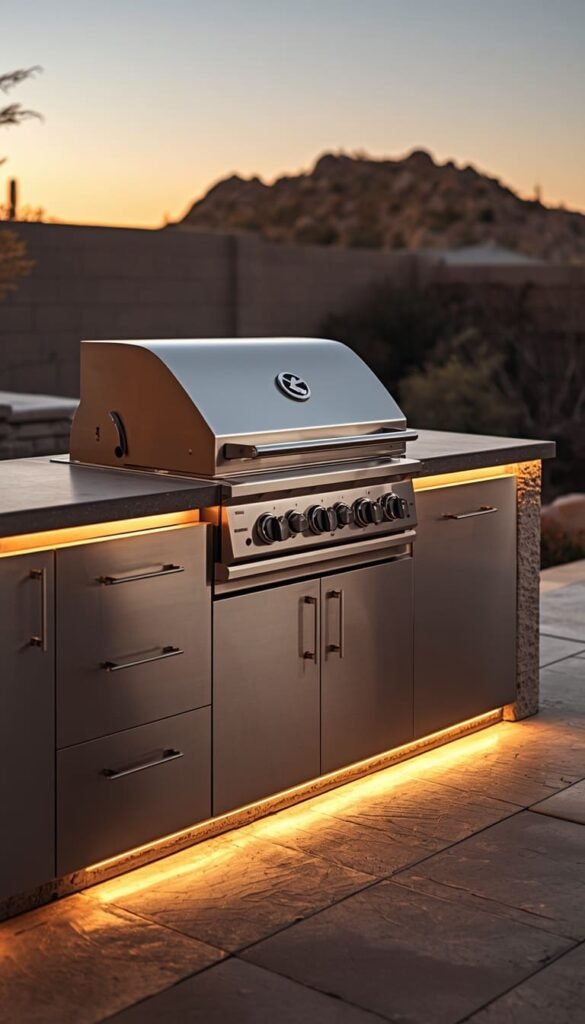
There’s a reason every commercial kitchen in America is built around stainless steel it’s hygienic, incredibly durable, and almost effortless to clean. Bringing that same material into your backyard grill island creates a cohesive, professional aesthetic that feels sharp and intentional rather than decorative.
A full stainless steel outdoor grill island works particularly well in modern and contemporary backyard designs. The reflective surface bounces light beautifully in the evening, especially when you add some low voltage LED lighting under the counter edge. I’ve specced this setup for several clients in Arizona and Nevada where the clean, minimal look complements the desert landscape perfectly. What most people don’t realize is that not all stainless steel is created equal outdoors. You want 304 grade stainless steel at minimum for outdoor use anything lower will show rust spots within a season, especially in coastal or high humidity environments. If you’re within a few miles of the ocean, step up to 316 marine grade stainless and don’t compromise on that.
12. Tile Finished Outdoor Cooking Area Bold Colorful and Easy to Clean

If you want your outdoor cooking area to have genuine personality, tile is the finish that delivers it better than almost anything else. And right now in American backyard design, bold tile is having a serious moment. I’m talking Talavera inspired patterns in the Southwest, coastal blue and white combinations in the Southeast, and geometric cement tile looks in urban contemporary spaces across the country.
Beyond the visual impact, tile is genuinely practical for outdoor kitchens. It handles heat well, cleans up quickly after a messy cook session, and holds up against the elements when properly installed. A quick trick I’ve learned from working with tile contractors on outdoor projects always use a polymer modified thinset mortar and grout rated for exterior use. Standard interior tile products will fail when exposed to freeze thaw cycles or sustained outdoor moisture, and you’ll be retiling within a couple of seasons.
The one area where I’d steer people away from tile is the countertop surface directly next to the grill. Grout lines trap grease and carbonized drippings in that high heat zone, and cleaning becomes genuinely tedious. Use tile on the island base and side panels all day long, but consider concrete or stainless steel for the actual cooking counter surface. That combination gives you the best of both worlds.
Are you starting from scratch with your backyard setup, or are you upgrading something you already have out there?
13. Custom Grill Island with Built In Refrigerator and Sink
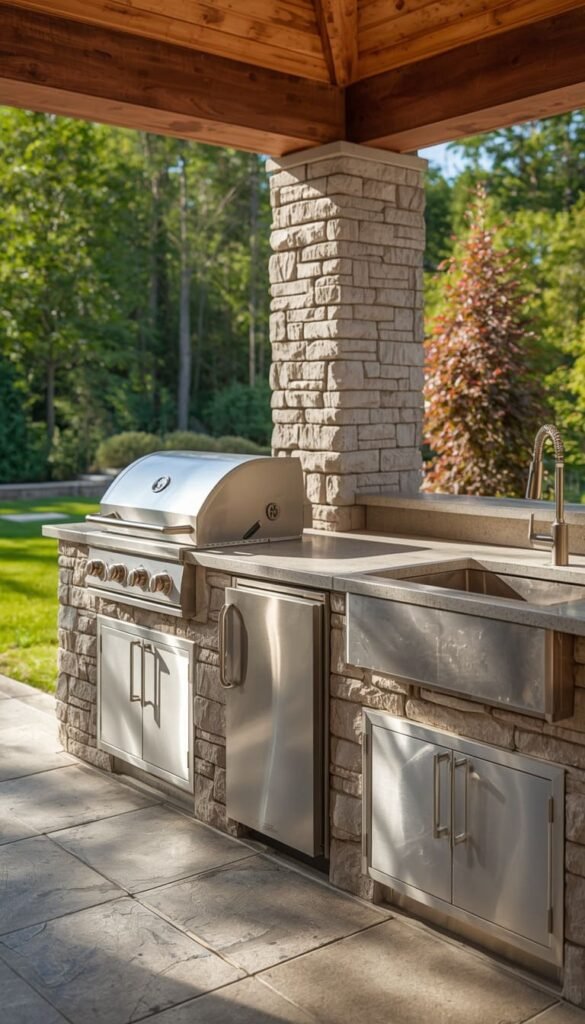
This is where your outdoor grill island stops being a cooking station and starts being a fully functional outdoor kitchen. Adding a built-in refrigerator and sink to your island sounds like a luxury upgrade, and honestly it is but it’s also one of those additions that changes how you actually use the space on a daily basis. No more running inside for drinks, no more carrying raw meat through the house, no more washing hands on a trip back indoors. Everything you need stays outside.
The refrigerator placement matters more than most people think. I always recommend positioning it on the shaded side of the island if possible, because an outdoor refrigerator working against direct afternoon sun has to work significantly harder to maintain temperature. That means higher energy consumption and a shorter compressor lifespan. For the sink, you’ll need a plumber to run a cold water line to the island and if you want hot water too, that’s an additional consideration for your budget. Most of my clients opt for cold water only outdoors, which keeps the plumbing simple and the cost reasonable.
A realistic budget for adding both a sink and an undercounter outdoor refrigerator to an existing or new island runs between $1,500 and $4,000 depending on appliance quality and local plumber rates. It is genuinely one of the highest return upgrades you can make to an outdoor cooking area.
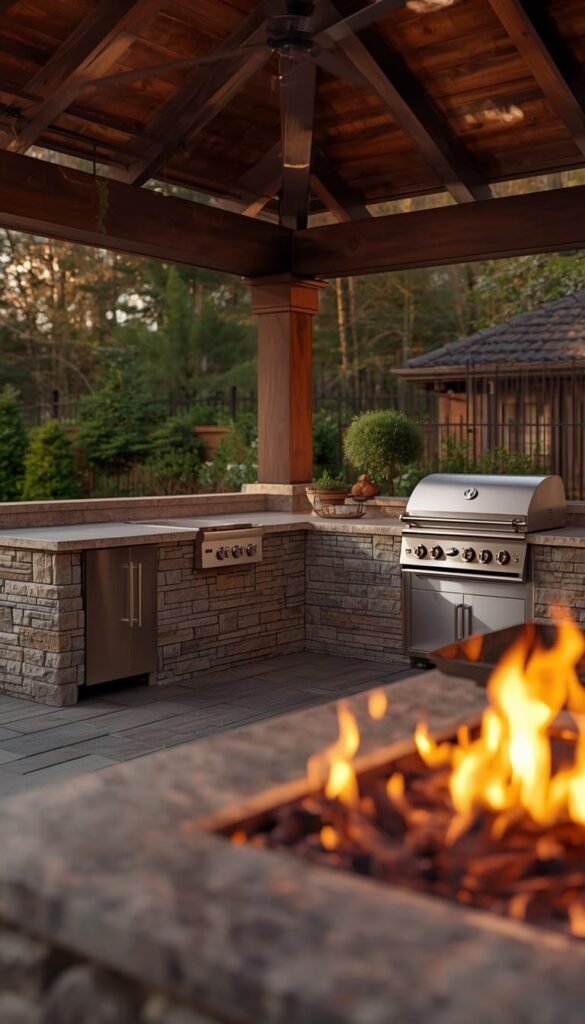
14. Fire Pit and Outdoor Grill Island Combo for Year Round Entertaining

Pairing a fire pit with your outdoor grill island is one of my favorite design moves for homeowners who want their backyard to work in every season. The grill island handles the cooking. The fire pit handles the ambiance, the warmth on cool evenings, and that magnetic pull that keeps guests lingering long after dinner is finished. Together, they create an outdoor living space that genuinely functions like an extension of your home rather than just a place to park a grill.
The layout relationship between the two elements is something I think about carefully on every project. Here’s what works best in my experience:
- Position the fire pit 10 to 12 feet away from the grill island to keep heat sources safely separated
- Arrange seating in a slight arc that faces both the fire pit and the island so guests feel connected to both zones
- If space allows, use a low landscape wall or a change in paving material to visually define the two areas without physically separating them
In climates like the Pacific Northwest or the Upper Midwest where evenings get cool even in summer, this combo extends your outdoor entertaining season by months. I’ve had clients in Oregon tell me they’re using their backyard in November because the fire pit setup makes it genuinely comfortable to be outside.
15. Smart Outdoor Grilling Setup with Tech Integrated Features
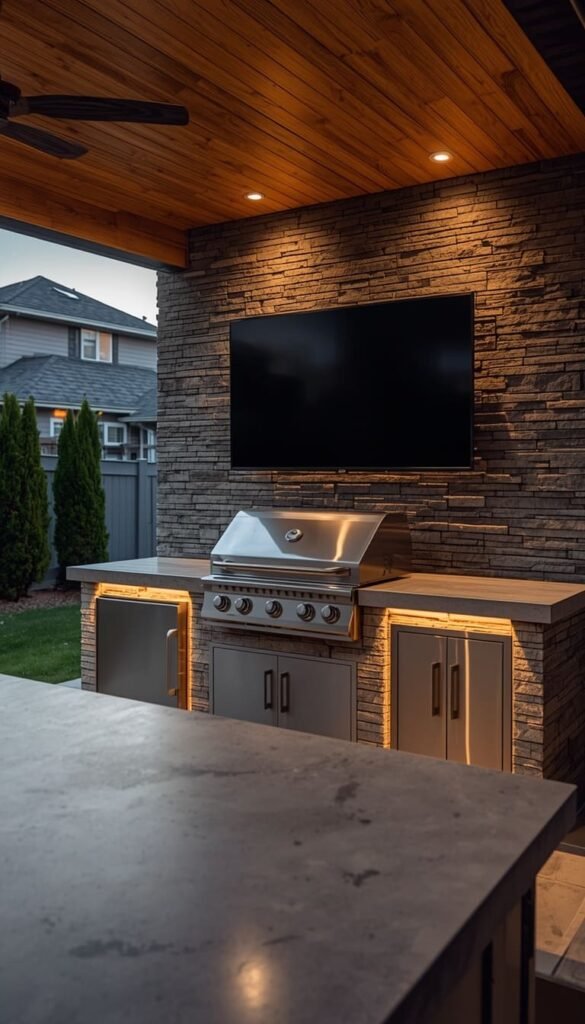
The outdoor kitchen space has gone genuinely high tech over the last few years, and I think it’s one of the most exciting directions the industry is moving in. Smart outdoor grilling setups are no longer just about a fancy grill with a temperature probe. We’re talking about fully integrated systems that connect to your home network and let you monitor cook temperatures, control LED lighting zones, manage a built-in sound system, and even watch the game from a weatherproof outdoor TV all from one app on your phone.
Brands like Weber, Lynx, and Coyote now offer Wi-Fi connected built-in grills that send alerts to your phone when your protein hits the target temperature. Pair that with a smart outdoor lighting system from a brand like Lutron or Kichler, and you can shift the entire mood of your backyard entertaining space with a single tap. One thing I always tell clients who are excited about tech integration run conduit during the initial build even if you’re not installing all the tech right away. Fishing wires through a finished outdoor kitchen structure after the fact is expensive and disruptive. Plan for it early and your future self will be genuinely grateful.
This is the direction outdoor living is heading, and homeowners who build with that in mind right now are going to have backyards that feel current and functional for the next decade rather than dated in three years.
Your 2 Minute Outdoor Grill Island Decision Map
By Budget
Starter and Budget Builds ($1,000 to $8,000)
- Go with a DIY concrete block base and stucco or tile finish
- Choose a drop-in mid-range grill insert over a premium built-in brand
- Skip the sink and fridge for now — add them later as upgrades
- Tile countertops are your best friend at this price point
Luxury and Investment Builds ($15,000 and above)
- Prioritize natural stone veneer or large format porcelain for the exterior finish
- Budget for a pizza oven or second cooking zone — it transforms the space
- Add a sink, undercounter fridge, and smart grill integration from day one
- Invest in a covered structure overhead — it protects appliances and adds serious resale value
By Lifestyle
Busy Families and Everyday Cooks
- Choose low maintenance finishes like porcelain tile or sealed concrete
- Bar seating built into the island keeps kids close and conversations going
- An undercounter fridge eliminates constant trips inside
- Stick with darker countertop colors — they hide the daily wear beautifully
Serious Entertainers and Weekend Hosts
- Go L-shaped for maximum counter and prep space
- A fire pit positioned 10 to 12 feet from the island extends your season into fall
- Smart grill tech and integrated lighting set the mood without any extra effort
- A covered outdoor kitchen means weather never cancels your plans
Frequently Asked Questions About Outdoor Grill Islands
How much does a built in outdoor grill island cost in the US?
The average cost runs between $8,000 and $20,000 for a contractor built island. DIY builds can come in as low as $1,500 if you use concrete block and do the labor yourself.
What is the best material for an outdoor grill island countertop?
Sealed concrete and porcelain slab are my top two picks. Both handle heat, UV exposure, and heavy use without cracking or staining the way softer stones can.
Do I need a permit to build an outdoor kitchen island?
Yes, in most US counties you will. Any island with a gas line, electrical connection, or plumbed sink almost always triggers a permit requirement check with your local building department before starting.
How do I protect my outdoor grill island during winter?
Cover your grill insert with a weatherproof cover and apply a fresh coat of penetrating sealer to stone or concrete countertops each fall. Disconnect and store any undercounter appliances if you live in a hard freeze climate.
Can I add a sink and refrigerator to an existing outdoor grill island?
Yes, but it requires a plumber for the water line and an electrician for a dedicated outdoor circuit. Budget around $1,500 to $3,500 for both additions depending on your location and existing utility access.
Conclusion
Your outdoor space is not just a patch of grass behind your house it is an extension of how you live, how you host, and how you recharge. An outdoor grill island is one of those projects that genuinely pays you back every single time you use it, whether that’s a quiet Tuesday dinner outside or a packed Saturday cookout with the whole neighborhood. You do not need a massive budget or a sprawling backyard to make it happen. You just need a clear plan and the confidence to take that first step, even if that step is simply sketching out your space on a piece of paper tonight.
So tell me which of these 15 outdoor grill island styles felt like the one made for your backyard?