Kids don’t need expensive toys they need dirt, water, and a little space to make a glorious mess. A mud kitchen gives them exactly that, and honestly, it might be the best thing you ever set up in your backyard. I’ve seen a simple plank and cinder block setup completely replace screen time for weeks. Whether you have a sprawling yard in the suburbs or a tight apartment balcony, there’s a mud kitchen idea here that will work for your space, your budget, and your kid’s imagination.
My Design Notes
Last spring, I was consulting on a backyard refresh for a family in Austin, Texas. They had a modest budget, a four year old with boundless energy, and a tablet that had basically become a fifth limb. We spent one Saturday afternoon putting together a mud kitchen from cinder blocks, a salvaged wooden plank, and a haul of thrifted pots. Total spend was $47, including a bag of play sand from Home Depot. By the next morning, that tablet was forgotten. Their daughter was running a full service mud bakery for the neighborhood kids, charging “leaf money” and everything. I share this because I want you to know, before we get into all the ideas and setups, that this does not need to be complicated or expensive to work beautifully.
Stunning Outdoor Mud Kitchen Ideas That Spark Endless Creative Play
1. The Classic Pallet Build
If there’s one mud kitchen idea that never goes out of style, this is it. A pallet build gives you that warm, worn in farmhouse look without spending much at all. Most hardware stores and local Facebook Marketplace listings have free or nearly free pallets just waiting to be picked up. Sand the edges smooth, add a couple of hooks for hanging ladles, and tuck a shallow bin into the bottom shelf for ingredient storage. The whole thing can come together in a weekend afternoon, even if your DIY experience is pretty basic. One thing to watch out for is the wood type always check that your pallets are stamped “HT” (heat treated) rather than “MB” (methyl bromide treated), because the chemical ones are not safe for kids to play around.
2. IKEA Hack Mud Kitchen
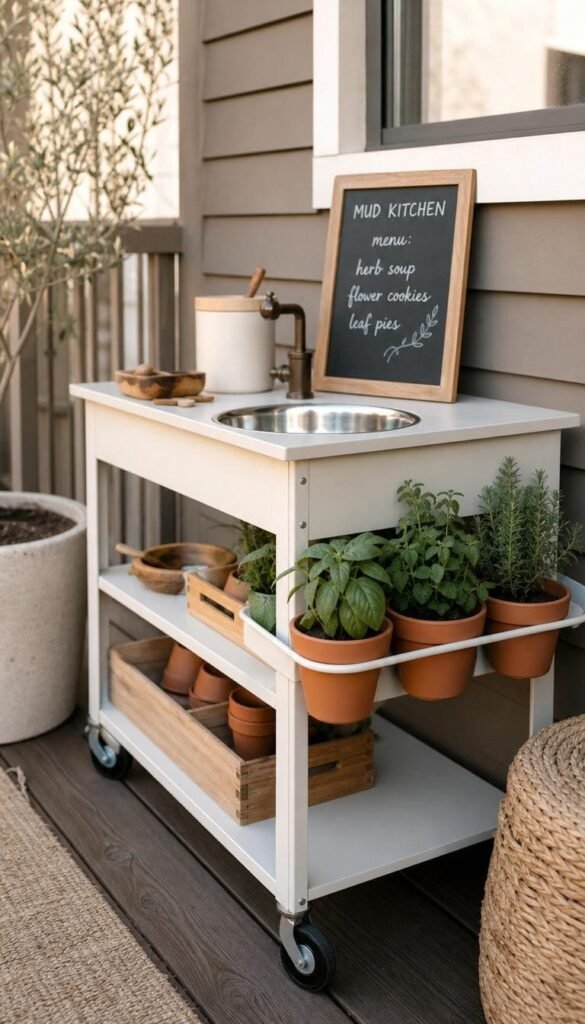
This one is a favorite of mine for families who want something that looks intentional and clean rather than rustic. A basic IKEA RÅSKOG cart or a FLISAT children’s table can be transformed into a surprisingly stylish mud kitchen with a little spray paint and some outdoor sealant. It works beautifully on apartment balconies and narrow decks where a full pallet build simply isn’t practical. The height is already perfect for toddlers, the shelves give you built-in storage, and the whole setup can be rolled indoors during bad weather. I’ve styled these with small terracotta pots of herbs on the side and a little chalkboard menu propped against the wall honestly, it looks like something out of a Magnolia catalog.
3. Cinder Block and Plank Setup
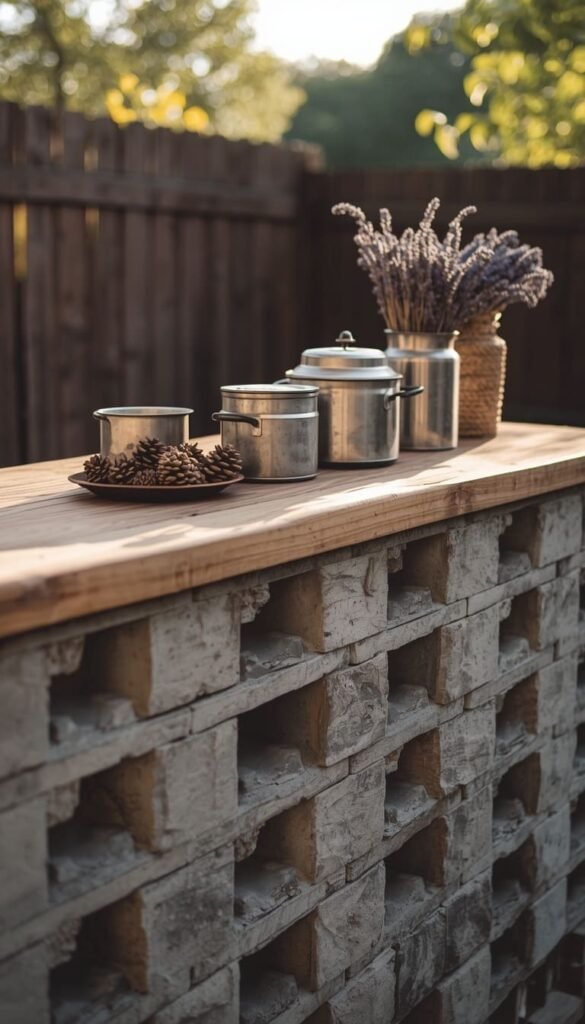
This is the one I recommend to every parent who tells me they’re not handy at all. No drilling, no sawing, no special skills required. You simply stack two rows of cinder blocks, lay a smooth wooden plank or an old butcher block offcut across the top, and you have a solid, sturdy mud kitchen counter in under 20 minutes. A quick trick I’ve learned is to grab cinder blocks from Home Depot for about $1.50 each and check Facebook Marketplace for free wood offcuts from local contractors. The result looks surprisingly charming when you add a few hanging pots and a small basket of natural ingredients on the side. This setup is also incredibly easy to reconfigure as your child grows taller.
- Total cost: Under $20 in most US cities
- Tools needed: Literally none
- Best for: Renters, beginners, and anyone who wants results fast
4. Upcycled Dresser or Cabinet Mud Kitchen
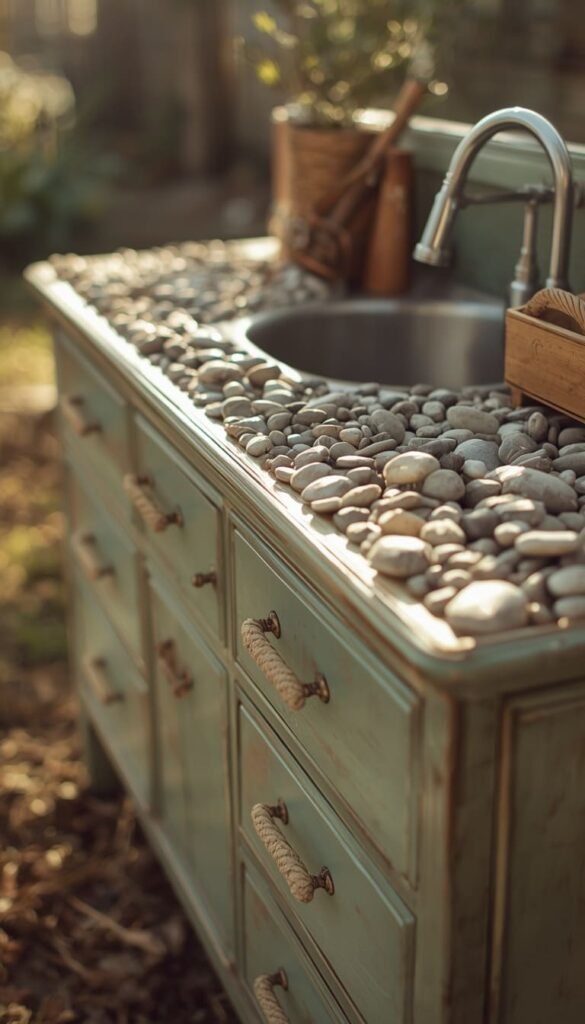
Thrift stores across the country are full of old dressers and low cabinets that are absolutely perfect for this. Remove the top drawer, drop in a stainless steel mixing bowl to act as the “sink,” and suddenly you have a mud kitchen with more character than anything you could buy brand new. I worked with a family in Nashville last summer who found a solid wood dresser at Goodwill for $12 and turned it into the most gorgeous boho mud kitchen I’ve ever seen. They painted it a soft sage green, added rope drawer pulls, and lined the top with smooth river pebbles. Their backyard looked like a page out of a lifestyle magazine. The only reality check here is sealing the wood properly use an outdoor rated, non toxic sealant so the piece holds up through rain and humid summers without warping.
Which of these mud kitchen ideas fits your outdoor space right now are you working with a full backyard or a small balcony?
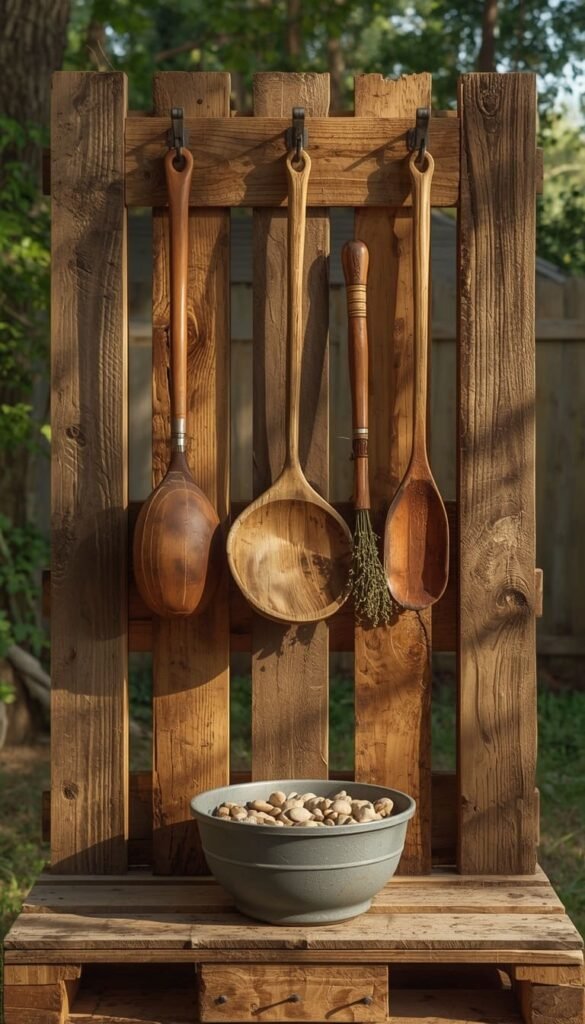
5. Wooden Workbench Mud Kitchen
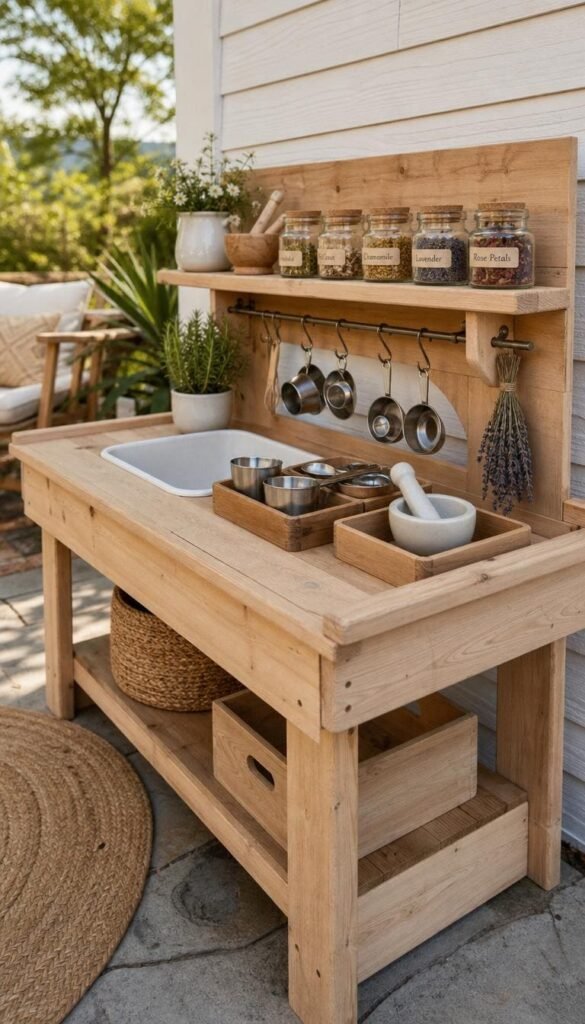
If you follow the Montessori philosophy at all, you already know how much it emphasizes child-sized, purposeful environments. A simple wooden workbench scaled to your child’s elbow height does exactly that. It tells a child, without saying a word, that this space belongs to them and that their work here is real and meaningful. You can find unfinished wooden workbenches at craft stores like Michaels or order a basic one from Amazon for around $60 to $80. What makes this setup feel truly Montessori is not the bench itself but what goes on it organized trays, labeled containers, real metal tools instead of plastic toys, and a small pitcher for water that your child can manage independently. Everything within reach, nothing overwhelming.
- Keep the surface uncluttered with just two or three activity trays at a time
- Rotate ingredients weekly to keep curiosity alive
- Use real but child-safe tools like a small whisk, a wooden pestle, and a metal measuring cup
6. Tub Kitchen for Small Spaces and Balconies
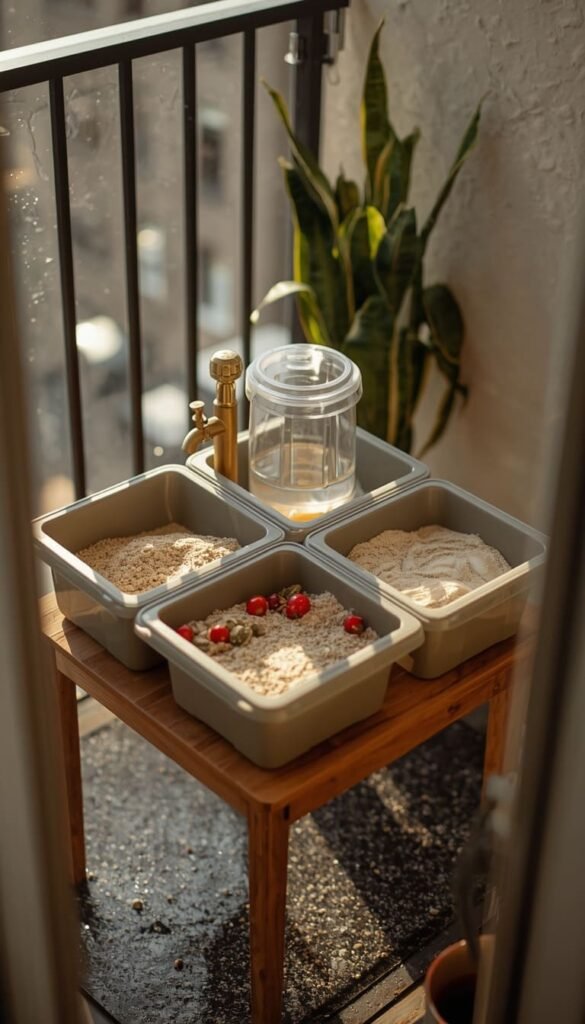
Not everyone has a backyard, and honestly, that should never be a barrier to mud play. A tub kitchen is simply two or three shallow bins or IKEA TROFAST trays arranged on a low outdoor table or even directly on a balcony floor. One tub holds damp soil or play sand, one holds water, and the third works as a mixing and cooking station. I’ve helped families in Chicago high rises and Brooklyn apartments set these up on their balconies, and the kids absolutely love them just as much as any backyard setup. A small beverage dispenser with a spigot works beautifully here instead of a hose because it gives kids control over their water without creating a flooding situation on a fourth floor balcony. Roll out a rubber mat underneath to catch the splashes and you are good to go.
Top 6 mud kitchen ideas:
| Idea | Estimated Price | Maintenance |
|---|---|---|
| Classic Pallet Build | $15 to $40 | Medium |
| IKEA Hack Mud Kitchen | $45 to $80 | Low |
| Cinder Block and Plank | $10 to $20 | Low |
| Upcycled Dresser or Cabinet | $12 to $50 | Medium |
| Wooden Workbench Montessori | $60 to $90 | Low |
| Ultimate Backyard Station | $100 to $150 | High |
7. Nature Play Kitchen with a Living Herb Wall

This idea takes a standard mud kitchen and turns it into something that genuinely connects kids with living, growing things. Mount a simple vertical pallet planter or a set of wall hung terracotta pots directly behind the mud kitchen work surface and fill them with child safe herbs like mint, lemon balm, lavender, and rosemary. Your child can snip fresh ingredients straight from the wall and add them to their mud soups and potions. A quick trick I’ve learned is to plant mint in its own separate container because it spreads aggressively and will take over every other plant if you let it. The sensory experience here is on another level entirely the smell of crushed lavender mixed with fresh soil on a warm summer morning is something kids genuinely remember. It also teaches them in the most natural, low pressure way possible that food comes from plants and that growing things takes patience and care.
8. Mud Pie Bakery Station
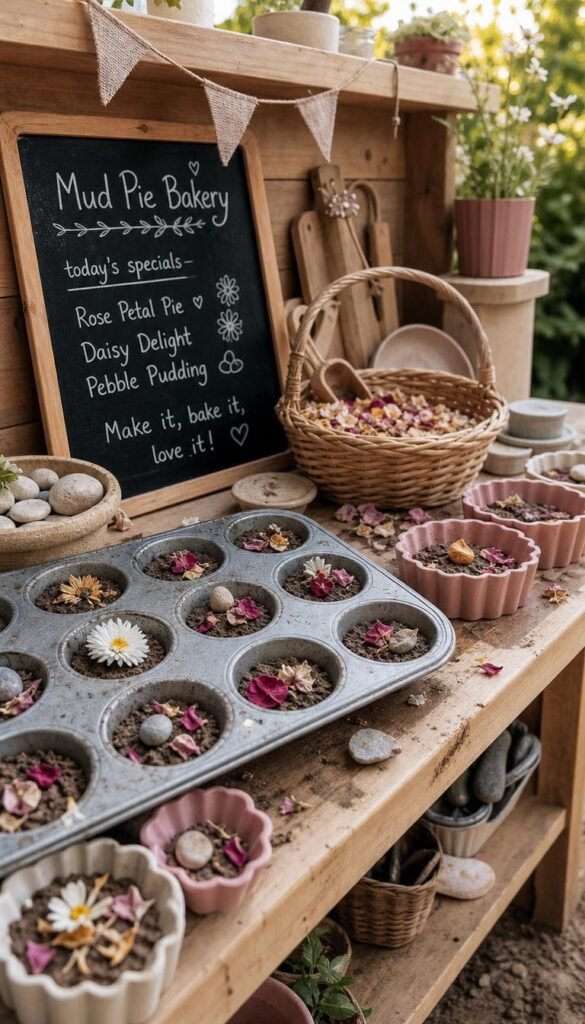
Some kids are less interested in potions and science experiments and more interested in running a business. This setup leans fully into that instinct. Arrange the mud kitchen like a little bakery counter muffin tins lined up front and center, a rolling pin on a hook, silicone molds in various shapes, and a small chalkboard menu propped up against the back wall. Add a little basket of “garnishes” like flower petals, smooth pebbles, and dried herbs and you have a setup that will keep a preschooler occupied for hours of deeply imaginative play. I always suggest including a small notepad and a stubby pencil so kids can take “orders” from siblings, parents, or stuffed animal customers. One thing most parents overlook is that this kind of role play is quietly building some serious real world skills negotiation, sequencing, math concepts, and creative problem solving, all wrapped up in what looks like pure fun.
9. Rustic Log and Stump Kitchen
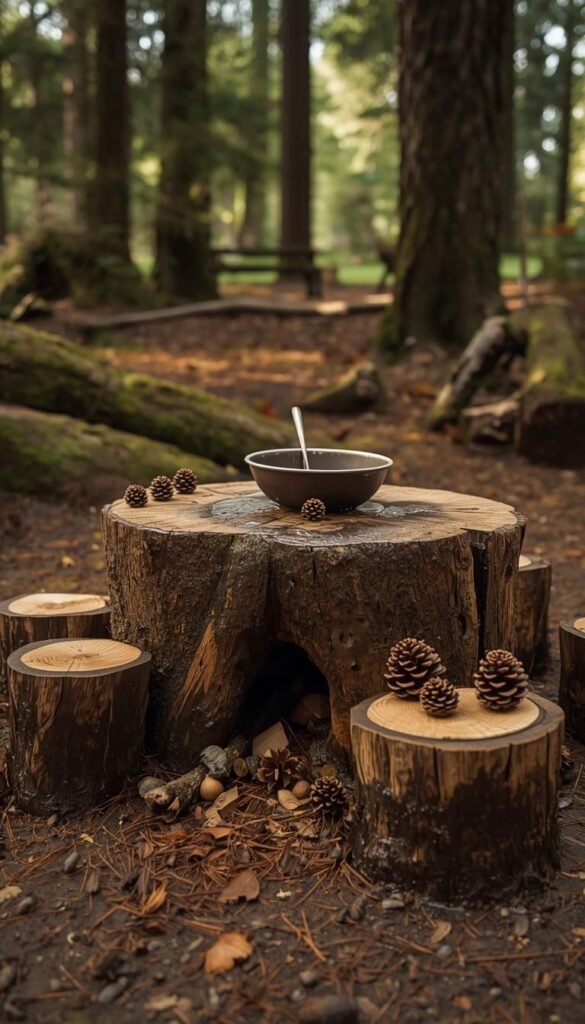
This one is for families who love that raw, untouched by humans aesthetic. A large tree stump becomes the work surface, smaller stumps become seats, and a hollowed out log section can hold water or act as a natural basin. If you have any wooded area nearby or know a local tree service, you can often get stumps and log sections for free tree companies are usually thrilled to offload them. I designed a setup like this for a family in the Pacific Northwest last fall, and it looked like it had grown there naturally. The kids treated it like a real forest kitchen, foraging pine needles, bark pieces, and rainwater for their recipes. There is something about natural materials that brings out a different, quieter, more focused kind of play in children. It feels less like a toy and more like a real place that belongs to them.
And what’s your budget looking like for this project are you going the thrifty $20 route or ready to invest in a full wooden build?
10. The Ultimate Backyard Mud Kitchen Station
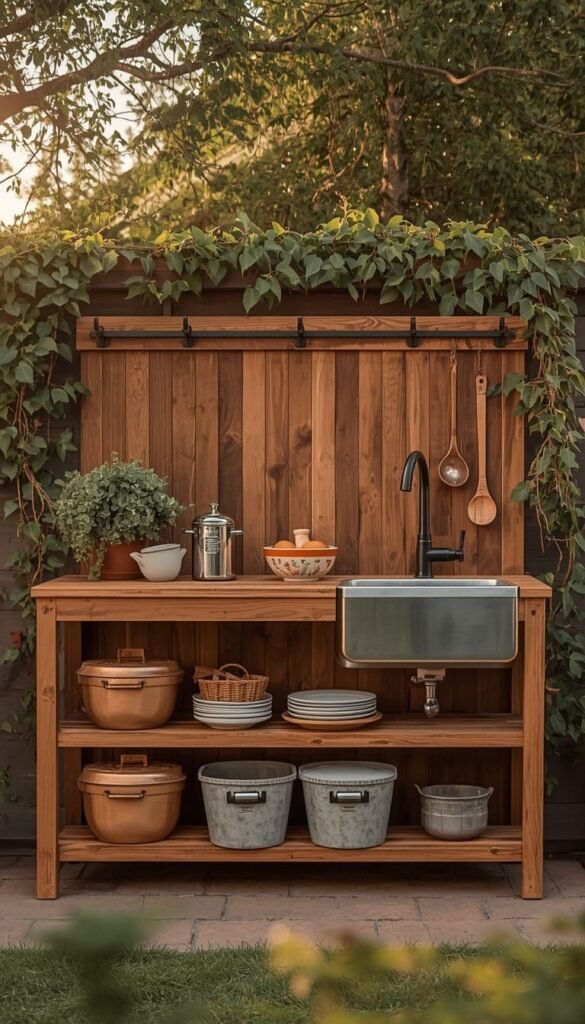
This is the one for families who are ready to go all in. A full build typically includes a dedicated counter surface at elbow height, a mounted sink basin with drainage, a small shelf unit below for storage, hooks along the back panel for hanging utensils, and a weatherproofed wood finish that will hold up for years. Budget somewhere between $100 and $150 if you source materials smartly dimensional lumber from Home Depot, a stainless steel mixing bowl from Walmart as the sink, and thrifted pots and tools for everything else. What separates this setup from a basic one is the intention behind it. When a child sees a space that was clearly built just for them, with real thought and care, they play differently. They treat it like their kitchen. They take ownership of it. And in my experience, that ownership translates into hours of independent, screen free play every single week.
Your 2-Minute Mud Kitchen Decision Map
By Budget
Starter and Thrift-Friendly ($10 to $50)
- Go with cinder block and plank or a pallet build
- Hit up Goodwill, Facebook Marketplace, and Home Depot
- Thrift your pots, pans, and utensils never buy new
- Perfect if you want to test whether your kid will actually use it before investing more
Investment and Dream Build ($60 to $150+)
- Choose the Montessori workbench or the ultimate backyard station
- Budget for outdoor sealant, proper drainage, and quality wood
- Think of it as a 3 to 5 year play investment, not a seasonal toy
- Worth every dollar if your child is between ages 2 and 7
By Lifestyle
Busy Families and Small Yards
- Tub kitchen or IKEA hack both set up in under 30 minutes
- Easy to clean, easy to store, zero tools required
- Balcony friendly and renter approved
Outdoor Enthusiasts and Nature Lovers
- Go rustic with the log and stump kitchen or the living herb wall setup
- Forage your ingredients, keep it wild and unstructured
- Pairs beautifully with a forest school or Montessori home approach
Frequently Asked Questions
What is the best material for an outdoor mud kitchen?
Solid wood sealed with a non toxic outdoor sealant is my top pick. It holds up through rain, looks beautiful, and is completely safe for kids. Avoid MDF it swells and warps fast outdoors.
How do I keep a mud kitchen from getting moldy?
Rinse tools after every play session and let everything air dry completely. Never leave standing water in bowls or basins overnight. A quick weekly wipe down with diluted white vinegar handles the rest.
What age is a mud kitchen good for?
Anywhere from 18 months to about 8 years old. Toddlers love pouring and dumping, preschoolers run imaginary cafés, and older kids turn it into science experiments. Same kitchen, completely different play at every stage.
Can I set up a mud kitchen on an apartment balcony?
Yes, absolutely. Use a tub kitchen setup with two or three shallow bins and a small beverage dispenser for water control. No hose needed, no mess beyond the mat you put underneath.
How much does a good mud kitchen cost in the USA?
Anywhere from $15 to $150 depending on your approach. A cinder block and plank setup runs under $20. A full wooden build with a sink basin and storage lands between $100 and $150 using Home Depot lumber and thrifted accessories.
Conclusion
Your kid doesn’t need a perfect backyard or a big budget to fall in love with outdoor play. Pick one idea from this list, grab a few thrifted pots, and just start even the simplest setup will surprise you with how much joy it creates. I’ve watched a $20 cinder block kitchen outperform a $500 swing set more times than I can count. Your backyard, your balcony, your tiny patch of outdoor space it’s already enough to make something really special happen.