Most homeowners spend thousands on landscaping while completely overlooking their downspouts. These Stylish Downspout Drainage Ideas show how a simple upgrade can protect your yard from water damage while adding a polished, intentional look to your outdoor space. I’ve walked through hundreds of yards across the US, and the number of beautiful gardens being slowly destroyed by poor drainage genuinely surprises me. The good news? Your downspout doesn’t have to be an eyesore or a problem. With the right approach, it becomes one of the most stylish and functional features in your entire yard. These 12 ideas will show you exactly how to make that happen.
My Design Notes
A few years back, I was working on a front yard project in Alpharetta, Georgia a suburb of Atlanta where the spring rainfall is heavy and the red clay soil is absolutely ruthless on drainage. The homeowner had a gorgeous brick walkway that was slowly turning orange from clay stained runoff dumping straight off the downspout. It was frustrating to see because the rest of the yard was genuinely beautiful. We pulled out that plain white PVC extension and replaced the entire discharge area with a dry creek bed using Cherokee rose pink river rocks, bordered with liriope grass that handles Georgia humidity like a champ. I tucked a rain barrel behind a cedar planter box with trailing sweet potato vine to hide it completely. The whole material cost came in just under $400. Two rainy seasons later, zero erosion, zero staining, and her neighbor across the street called me asking for the exact same setup. That project is honestly what pushed me to put this guide together.
Stunning Downspout Drainage Solutions That Protect Your Home and Elevate Your Yard
1. Dry Creek Bed Downspout Drainage That Makes Your Yard Look Professionally Landscaped
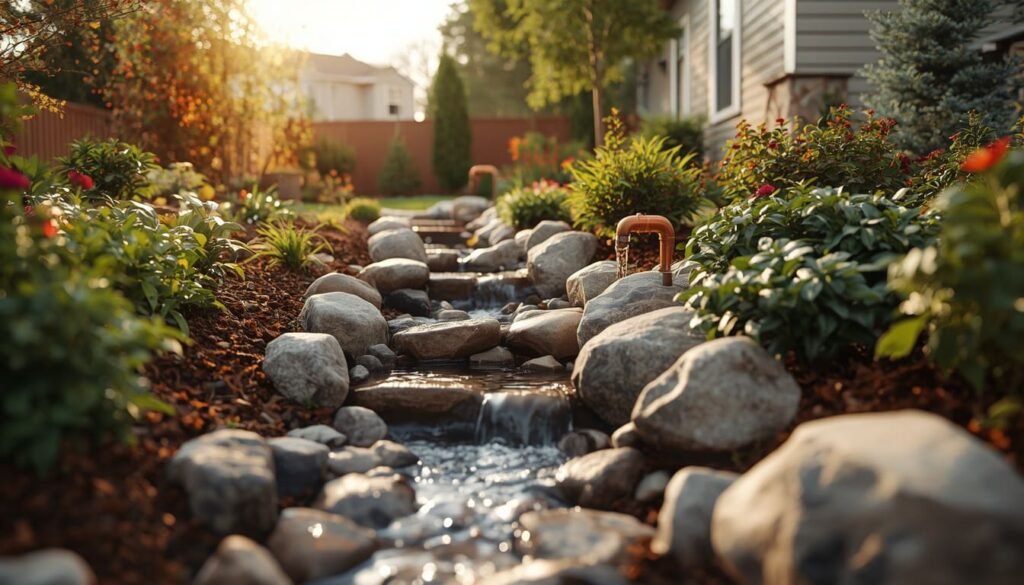
A dry creek bed is honestly one of my favorite solutions to recommend because it solves a real drainage problem while looking like you hired a landscape architect. The concept is simple you create a shallow, winding channel filled with river rocks that guides water away from your downspout and across your yard naturally. When it rains, it looks like a real babbling brook. When it’s dry, it still looks intentional and beautiful.
What makes this work so well in American yards is the versatility. I’ve installed versions of this in Modern Farmhouse properties in Tennessee and contemporary suburban lots in the Carolinas, and it fits both perfectly. Use larger boulders at the start near the downspout where water force is strongest, then transition to smaller smooth river rocks as the channel widens out.
A quick trick I’ve learned over the years line the base with landscape fabric before laying your rocks. It prevents weeds from pushing through and saves you hours of maintenance every season.
- Budget range: $80 to $300 depending on yard size and rock type
- Best plants to border it: liriope, ornamental grasses, or creeping Jenny
- Works beautifully in both front yard and backyard settings
2. Rain Chain Ideas That Turn an Ordinary Gutter Into a Stunning Water Feature
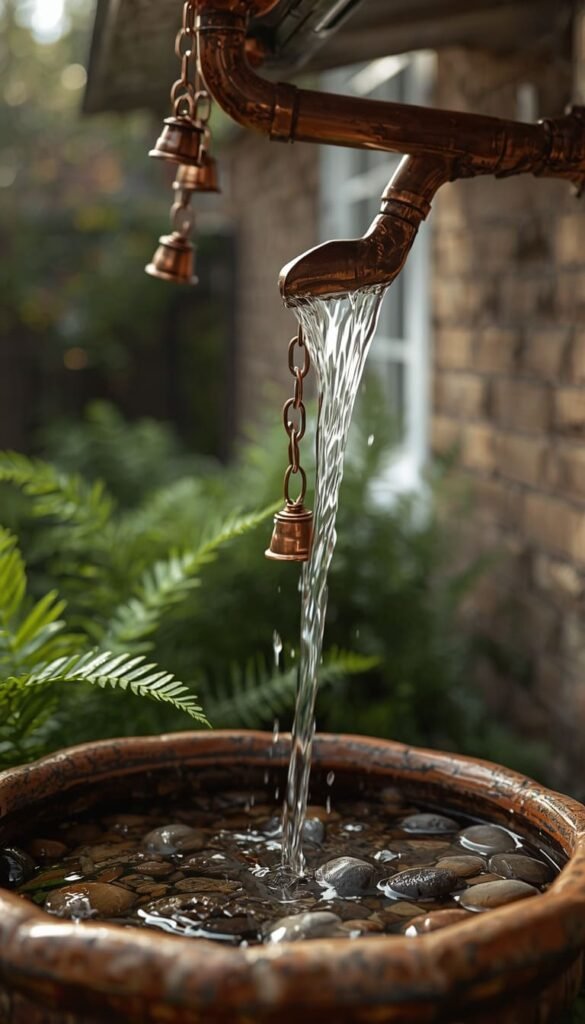
Rain chains are one of those ideas that make guests stop and ask “where did you get that?” They replace your standard downspout pipe with a decorative chain or series of cups that guide water downward in a graceful, visible flow. The sound alone is worth it that gentle trickling during a rainstorm is genuinely relaxing.
Originating in Japan centuries ago, rain chains have found a very comfortable home in American garden design, especially in Pacific Northwest yards where rain is practically a lifestyle. Copper is the most popular material and honestly my top recommendation. It starts bright and warm, then ages into a beautiful verdigris patina that looks expensive without trying.
One thing to watch out for if you live in the Midwest or Northeast rain chains can freeze solid in winter and the ice weight causes damage. I always advise clients in colder climates to remove them between November and March, or choose aluminum versions that handle temperature swings a little better.
- Copper rain chains: $40 to $150
- Aluminum options: $25 to $80
- Pair with a decorative basin or large ceramic pot at the base to catch the flow beautifully
3. Decorative Splash Blocks That Work as Garden Art
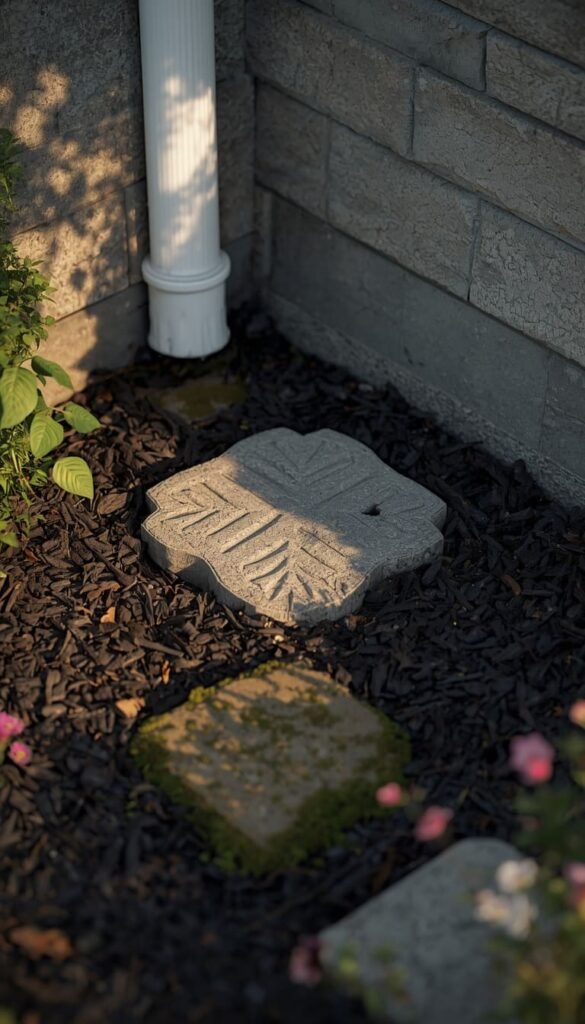
Splash blocks are probably the most underrated item in the entire world of downspout drainage. Most people grab a plain gray concrete rectangle from the hardware store and call it a day. But the options available now cast stone leaf shapes, frog designs, river stone textures are genuinely gorgeous and cost almost nothing extra.
I worked on a cottage style garden in Virginia where the homeowner had four downspouts, each with a different decorative splash block. One was a cascading leaf, another a mossy stone finish. It looked completely curated and intentional. The whole set cost her under $120 total. That’s the kind of small detail that quietly elevates an entire exterior.
The practical side matters too. A good splash block should extend at least 24 inches from your foundation and angle slightly downward so water moves away from the house. If your yard is relatively flat, pair it with a short flexible extension underneath to push water a bit further before it hits the ground.
4. Downspout Planter Ideas That Hide the Pipe and Grow Something Beautiful
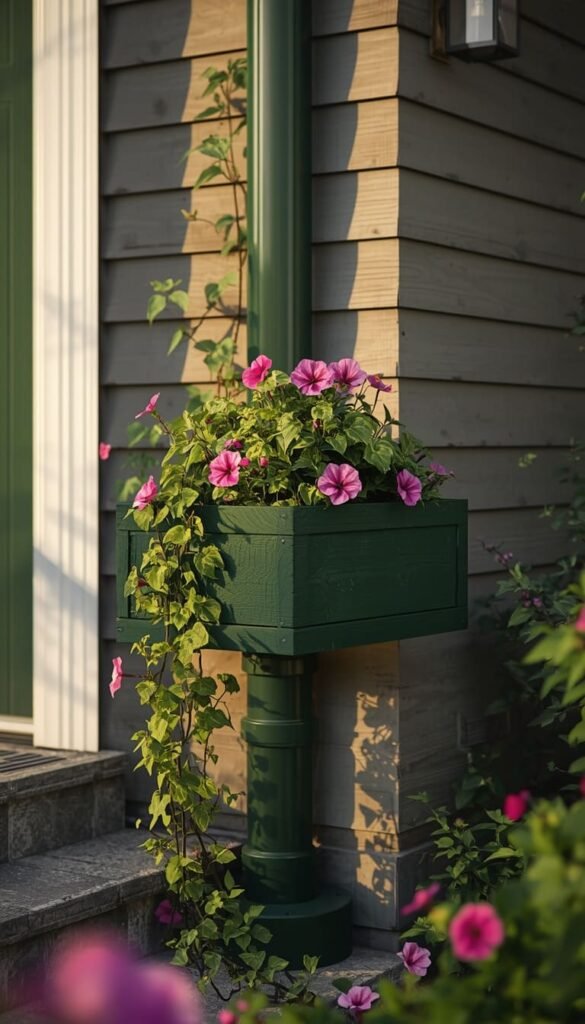
This is one of those ideas where function and style meet so perfectly that I’m surprised more homeowners don’t do it. The concept is straightforward you build or buy a planter box that surrounds your downspout, concealing the pipe entirely while adding a lush, living element to your exterior.
I’ve seen this done beautifully with cedar planter boxes painted in muted black or deep forest green, filled with trailing sweet potato vine, petunias, or ornamental kale depending on the season. In winter, you swap in evergreen sprigs or decorative branches and it still looks polished.
A few things to keep in mind before you build:
- Make sure your planter has drainage holes you don’t want water pooling around your foundation trying to escape a sealed box
- Keep the planter lightweight if it’s sitting on a deck or raised surface; wet soil gets surprisingly heavy
- In hot southern states like Texas or Arizona, choose drought tolerant plants that won’t suffer between rainstorms
The overall material cost for a DIY cedar version runs about $60 to $150, and it genuinely looks like something from a high end garden catalog.
Top 6 Stylish Downspout Drainage Ideas:
| Idea | Estimated Price | Maintenance |
|---|---|---|
| Dry Creek Bed With River Rocks | $80 to $300 | Low |
| Rain Chain With Decorative Basin | $40 to $150 | Medium |
| Underground Downspout Extension | $150 to $1,500 | Low |
| Rain Garden With Native Plants | $100 to $400 | Medium |
| French Drain System | $1,500 to $6,000 | Low |
| Corten Steel Basin With Gravel Channel | $200 to $550 | Low |
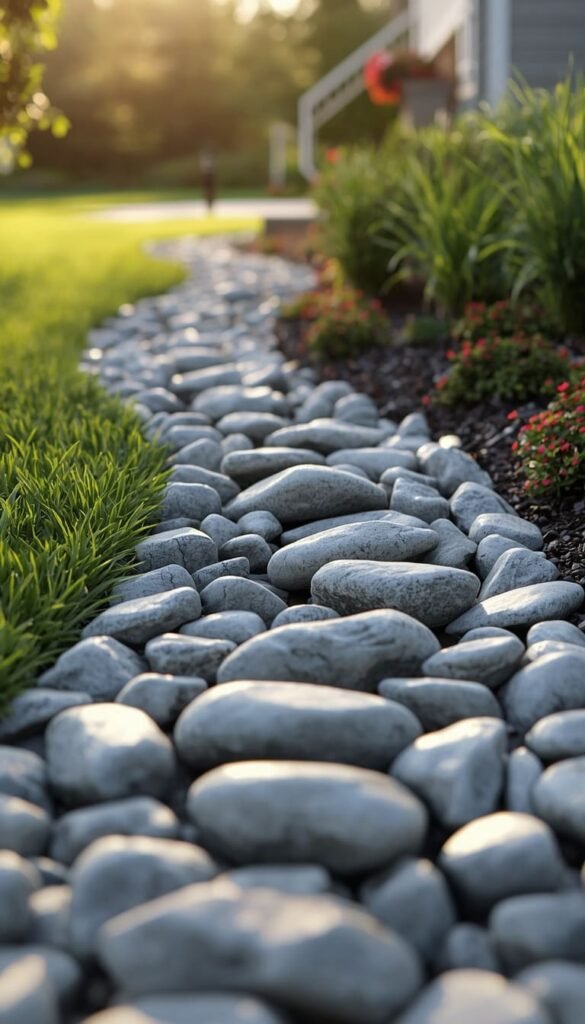
5. Dry Creek Bed With River Rocks as a Front Yard Drainage Idea That Sells Homes
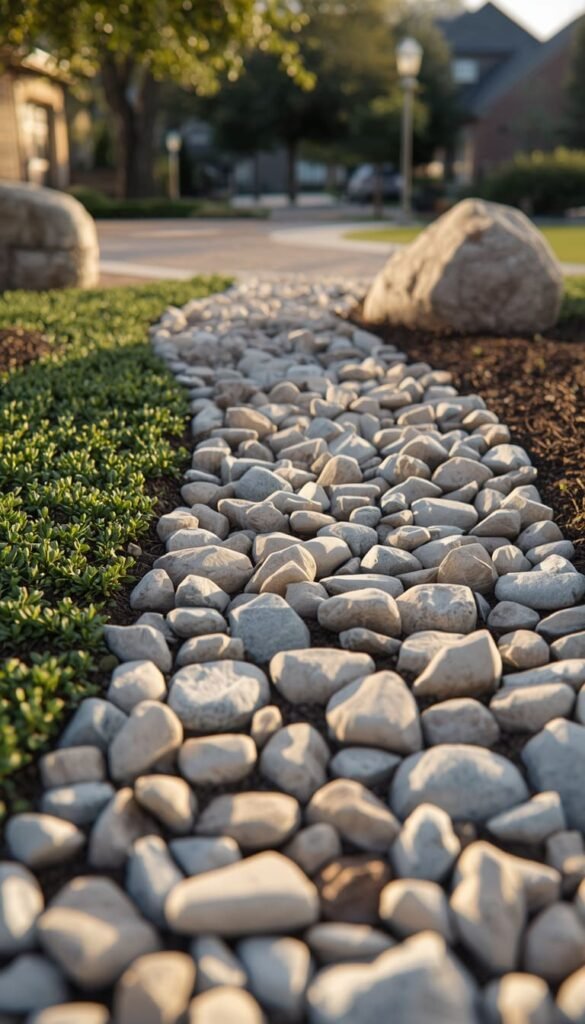
Here’s something most homeowners don’t think about until they’re listing their property good drainage that looks great actually adds resale value. Real estate agents in rainy markets like the Pacific Northwest and the Southeast consistently tell me that visible, well-designed drainage solutions are a selling point, not just a utility feature. A dry creek bed running along the front yard signals to buyers that the home has been thoughtfully maintained.
For front yard applications, I recommend keeping the rock palette clean and cohesive. Stick to two rock sizes maximum one larger anchor stone and one smaller fill rock. Mixing too many colors or sizes starts to look cluttered from the street. Pale gray river rock against dark mulch is a combination that photographs beautifully and holds up through every season.
One thing to watch out for is rock migration. After heavy rains, smaller stones can scatter across your lawn or walkway. A simple fix is using a slightly deeper channel about 4 to 6 inches and lining the edges with larger border stones or low-growing ground cover like creeping thyme to hold everything in place naturally.
Which of these drainage ideas are you planning to try first a dry creek bed, a rain chain, or something else entirely?
6. Underground Downspout Extensions as the Hidden Drainage Solution Pros Swear By
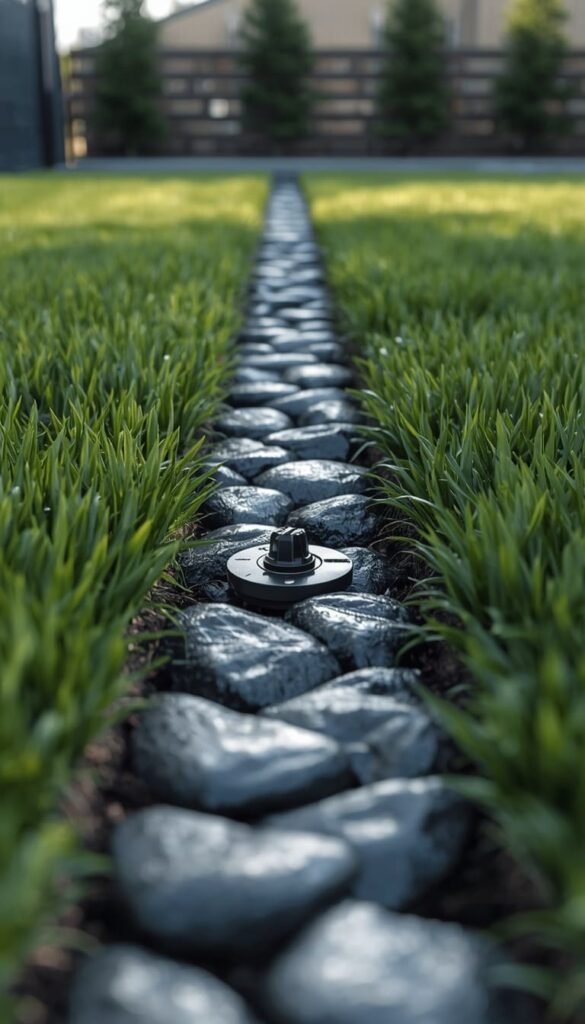
If you want your yard to look completely clean and uninterrupted no visible pipes, no rock channels, no decorative features at all underground downspout extensions are the answer. The pipe connects directly to your existing downspout, runs beneath the soil, and discharges water at a safe distance from your foundation, usually into a pop-up emitter hidden in the lawn or garden bed.
I’ve recommended this solution most often to clients with sleek modern homes where any visible drainage element would disrupt the clean aesthetic they’ve worked hard to achieve. It’s also my go-to for side yards where there simply isn’t enough space for a decorative creek bed or planter setup.
Here’s the honest cost breakdown most websites skip over:
- DIY installation with basic flexible pipe and a pop up emitter: $150 to $350 depending on run length
- Professional installation with rigid PVC and proper slope grading: $800 to $1,500 per downspout
- When you genuinely need a pro if your yard is flat with less than 1% natural slope, please don’t DIY this. Improper grading means water flows back toward your foundation and you’ve made the problem significantly worse.
The maintenance reality is also worth mentioning. Underground pipes can clog with debris and root intrusion over time. Flushing them out with a garden hose every spring takes about ten minutes and saves you from a much bigger headache later.
7. Rain Garden Landscaping as an Eco Friendly Downspout Idea Your Neighbors Will Notice
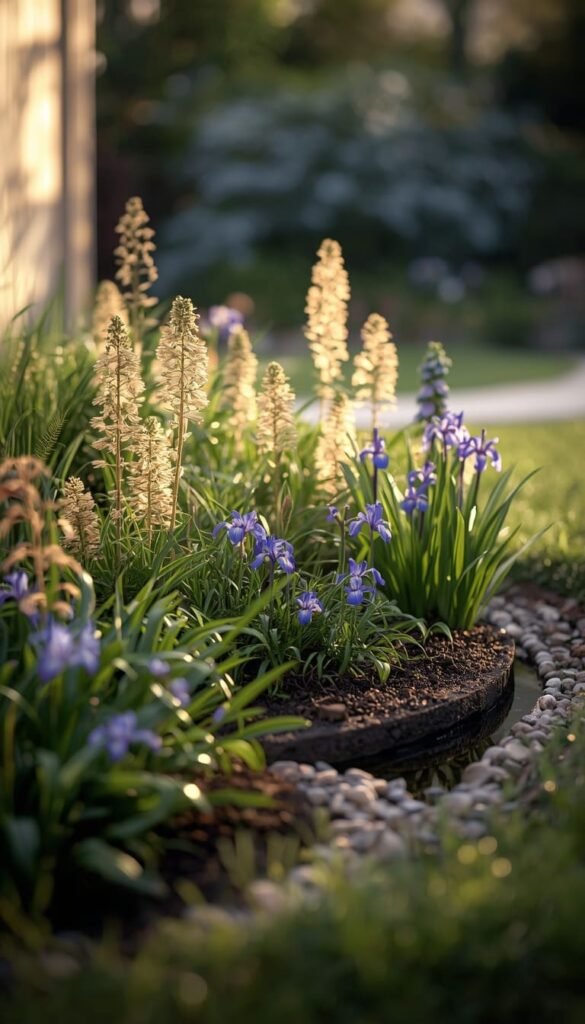
A rain garden is essentially a shallow, bowl shaped depression planted with native species that absorbs and filters runoff from your downspout naturally. It’s one of the most environmentally responsible drainage ideas available, and when it’s done well, it looks like a lush, intentional garden bed that happens to be incredibly functional.
What I love most about rain gardens is that they’re genuinely regional. The plants you choose should reflect where you live, and that’s what makes each one feel personal and authentic rather than cookie cutter.
- Southeast and Gulf Coast: Louisiana iris, swamp milkweed, and inkberry holly thrive in wet-dry cycles
- Midwest: prairie dropseed, wild bergamot, and blue flag iris handle heavy spring rains beautifully
- Pacific Northwest: red-twig dogwood, sedges, and native ferns are practically made for this application
Size matters here too. A basic rule of thumb I use with clients is that your rain garden should be roughly 20% of the size of the area draining into it. So if your roof section feeding that downspout covers 500 square feet, you’re looking at a 100 square foot garden minimum. Dig it about 6 inches deep, amend the soil with compost for better absorption, and you’re set.
8. Stacked Flat Rock Waterfall as a Budget DIY Downspout Drainage Idea Under $50
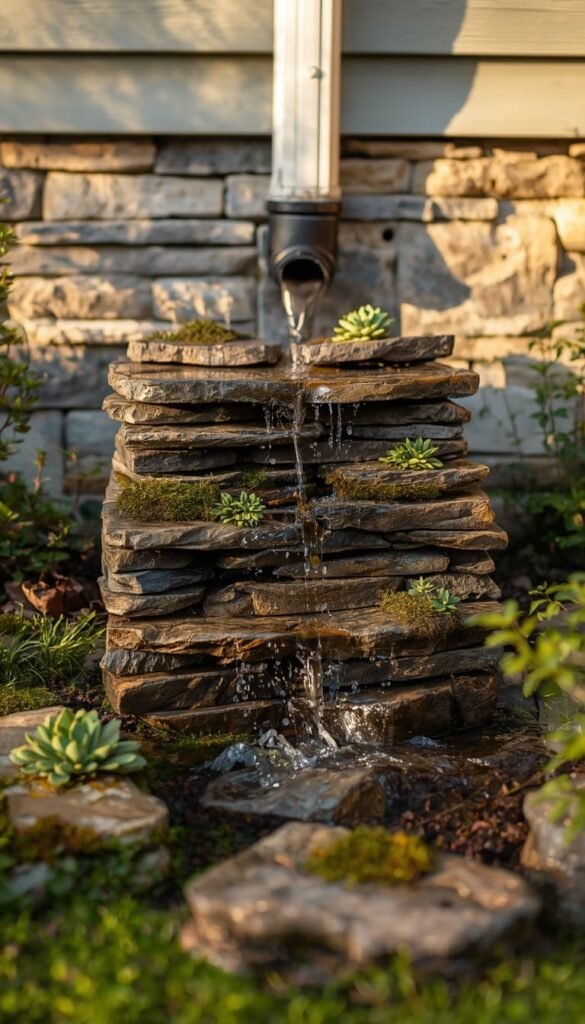
This one genuinely surprises people when I tell them what it costs. Stacking flat fieldstones or flagstone pieces beneath your downspout outlet creates a miniature waterfall effect that looks like it belongs in an upscale garden center display. When rain hits, water cascades down the stacked stones with that soft, satisfying sound. When it’s dry, it reads as a sculptural rock feature.
The key to making this look natural rather than just a pile of rocks is layering with intention. Start with your largest, flattest stone at the base. Each layer above should be slightly smaller and angled forward just a touch so water flows outward rather than pooling behind the stack.
I’ve built versions of this for clients in North Carolina and Colorado using locally sourced stones, which kept costs remarkably low. Most garden centers and landscape supply yards sell fieldstone by the pound or by the flat, and $30 to $50 worth of material is honestly all you need for a standard residential downspout. Add a couple of low growing sedums or moss tucked into the gaps between stones and the whole thing looks like it’s been there for years.
9. Rain Barrel With Decorative Planter Surround as a Style Meets Water Conservation Solution
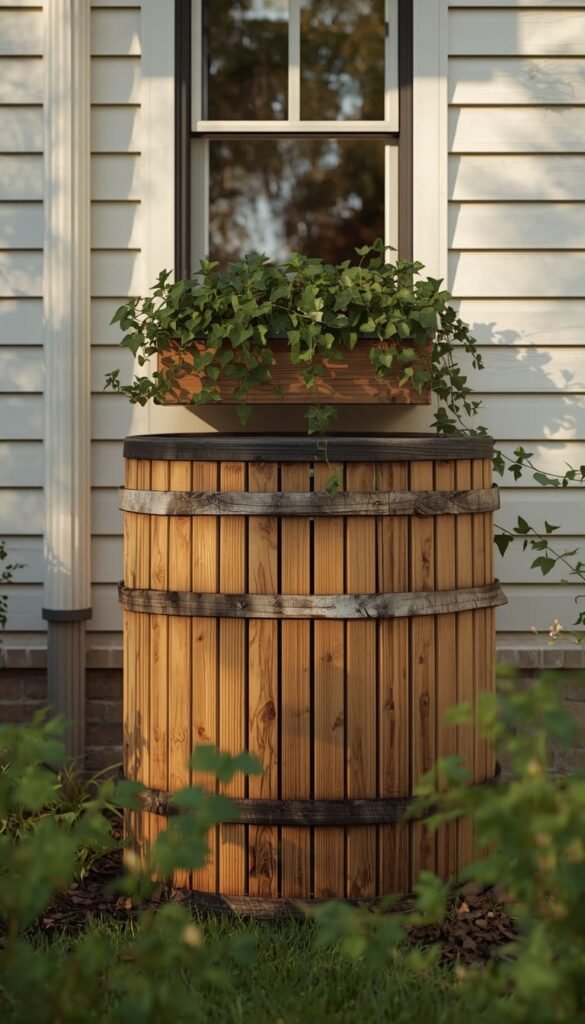
Rain barrels have a bit of an image problem. The standard plastic barrel sitting under a downspout looks utilitarian at best and frankly a little neglected at worst. But wrap that same barrel in a cedar slat surround, add a window box of trailing ivy on top, and suddenly you have a genuine garden feature that people compliment rather than overlook.
I’ve helped several clients in the Atlanta and Charlotte areas create exactly this setup, and the transformation is always dramatic. The barrel does the same job collecting and storing rainwater for garden use but it looks completely intentional and designed.
Before you install one though, here’s something most guides completely skip over. Several states and municipalities across the US have specific regulations around rainwater collection. HOA communities in particular can be restrictive. States like Colorado have historically limited residential rain barrel use due to water rights laws, though regulations have loosened in recent years. Always check your local ordinances before investing in a full setup. A quick call to your city’s water department takes five minutes and saves potential headaches.
- A 50 to 55 gallon barrel handles one average rainfall event from a standard residential roof section comfortably
- Position it on a slightly elevated platform even 12 inches of height creates enough pressure for a gravity-fed drip hose connection
- Cedar surrounds weather beautifully and need zero painting or sealing in most US climates
10. French Drain Landscaping for When Your Yard Needs More Than a Pretty Rock Path
There comes a point with some yards where decorative solutions simply aren’t enough. If you’re seeing standing water that lingers for more than 24 hours after rain, if your lawn feels spongy underfoot even on dry days, or if water is visibly tracking toward your foundation a French drain is what you actually need.
A French drain is a gravel filled trench containing a perforated pipe that redirects groundwater and surface runoff away from problem areas. It works underground and handles significantly more water volume than any surface level decorative solution. That said, it doesn’t have to be invisible or purely utilitarian.
I’ve designed French drain systems where the surface treatment above the buried pipe is a beautifully laid flagstone path, a river rock channel, or even a planted garden bed. The drainage happens below ground while the surface above looks completely polished and intentional. That combination of hidden function and visible beauty is honestly my favorite thing about this solution.
The honest reality on cost a professionally installed French drain runs between $1,500 and $6,000 depending on length, depth, and discharge complexity. DIY is possible for shorter runs in sandy or loamy soil, but clay-heavy yards really do need professional grading to ensure proper slope. Getting the pitch wrong by even half a percent means water sits in the pipe rather than flowing out, and you’ve spent significant money making nothing better.
And be honest had you ever thought about your downspout as a design opportunity before reading this?
11. Pebble Mosaic Drainage Path as the Artisan Downspout Idea for Detail Obsessed Homeowners
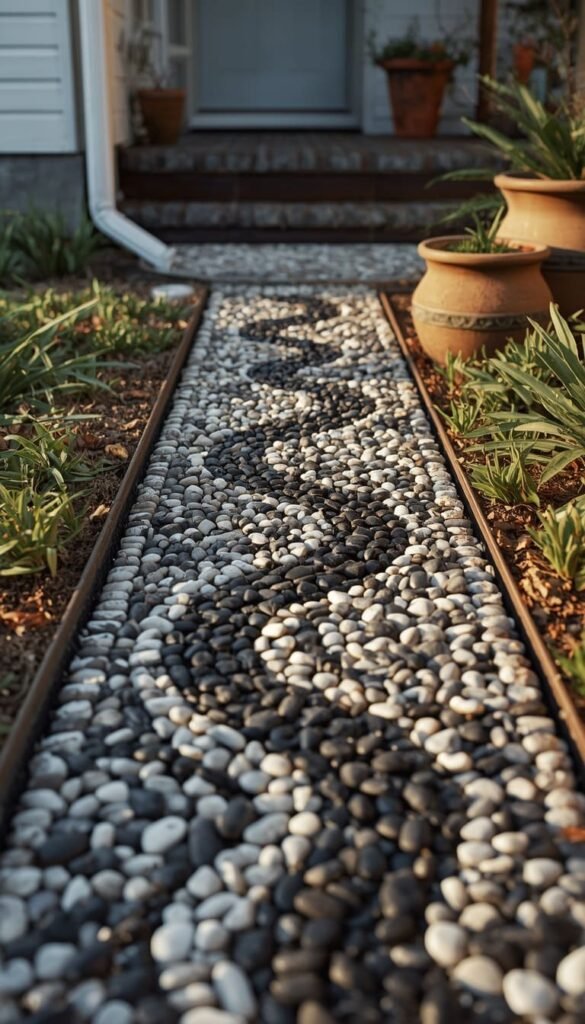
If you love the idea of your drainage system being genuinely handcrafted and one of a kind, a pebble mosaic path is the most artistic solution on this entire list. The concept involves setting smooth pebbles into a mortar base in decorative patterns spirals, waves, geometric designs that channel water along a defined path while functioning as a permanent piece of outdoor art.
I first encountered this done really well on a project in Savannah, Georgia, where the homeowner had created a flowing wave pattern using black and white river pebbles beneath her rear downspout. It connected visually with her coastal style garden and looked like something from an Italian courtyard. The entire installation cost her about $200 in materials and a long weekend of patient work.
A few practical notes worth knowing before you commit to this one. Pebble mosaics set in mortar are permanent, so plan your water flow direction carefully before you start mixing anything. In northern states think Minnesota, Michigan, upstate New York the freeze thaw cycle through winter can crack mortar joints over time. Using a flexible polymer modified mortar rather than standard Portland cement makes a meaningful difference in longevity. Sealing the finished surface every two to three years also keeps the colors vivid and prevents moisture from working into the base.
12. Corten Steel Basin and Gravel Channel as the Modern Gutter Drainage Idea for Minimalist Yards
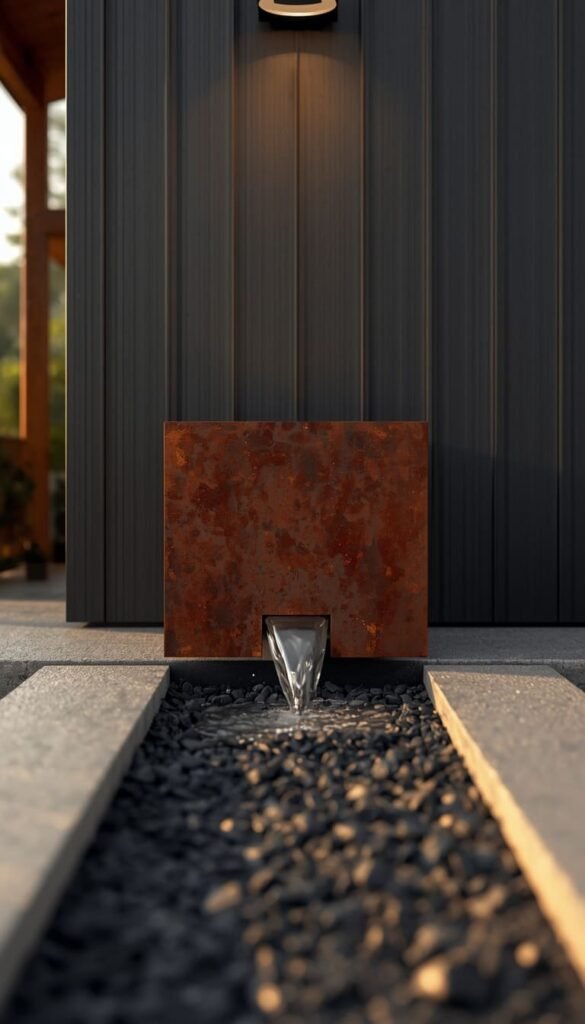
This is the idea I’ve been recommending most frequently over the past two years, especially for clients with contemporary, minimalist, or Modern Farmhouse exteriors. A Corten steel basin placed at the downspout outlet paired with a clean gravel channel leading away from the house is about as close to functional sculpture as residential drainage gets.
Corten steel also called weathering steel develops a rich, warm rust toned patina naturally over time without actually degrading the way standard steel does. It looks intentional, rugged, and genuinely beautiful against dark house siding, white board and batten, or natural wood exteriors. Paired with light colored crushed granite or charcoal lava rock in the channel, the contrast is striking.
What makes this solution particularly smart is how low maintenance it actually is. No plants to water, no chains to remove in winter, no mortar to reseal. The steel handles weather without complaint and looks better as it ages rather than worse. The main investment is upfront a quality Corten steel basin runs $150 to $400 depending on size, and the gravel channel materials add another $50 to $150 for an average yard.
One thing I always mention to clients considering this option make sure your overall exterior palette can handle warm rust tones. It pairs magnificently with black, charcoal, white, and natural wood. Against a red brick facade though, the competing warm tones can clash in a way that feels busy rather than bold.
The 2 Minute Drainage Decision Map
By Budget
Starter and Budget Friendly (Under $300)
- Tight budget but want real impact? Go with a dry creek bed using river rocks
- Want something charming and unique? A rain chain with a ceramic basin costs under $150
- Need the absolute simplest fix? Decorative splash blocks start at $20 and still look intentional
- DIY weekend project with leftover materials? Stacked flat rock waterfall costs under $50
Investment and Long Term (Over $500)
- Want zero visible drainage elements in your yard? Underground extension is your answer
- Dealing with serious standing water that won’t quit? French drain is the only real solution
- Love clean modern aesthetics and hate maintenance? Corten steel basin with gravel channel ages beautifully and asks almost nothing of you
By Lifestyle
Active Families and Pet Owners
- Skip the pebble mosaic small rocks scatter and become a hazard with kids and dogs running around
- Dry creek beds and underground extensions are your safest and most durable choices
- Rain barrels with planter surrounds keep curious hands away from the drainage mechanics
Minimalists and Curb Appeal Focused Homeowners
- Underground extensions and Corten steel basins keep your yard looking completely uncluttered
- A simple rain garden with native grasses reads as intentional landscaping, not a drainage fix
- Less is more one well executed solution beats four decorative ones competing for attention
Frequently Asked Questions
What is the cheapest way to redirect water from a downspout?
Decorative splash blocks start at $20 and handle basic redirection well. For more distance, a flexible downspout extension costs $10 to $30 and takes about ten minutes to install.
How far should a downspout drain from the house foundation?
Ideally, at least 6 feet minimum but 10 feet is what I recommend to clients in high rainfall states like Georgia or Oregon. Anything less and you’re just slowing the damage, not preventing it.
Do rain chains work in heavy rain?
Yes, but with limits. Rain chains handle moderate rainfall beautifully. During a heavy downpour they can overflow and splash, so always pair them with a wide collection basin at the base.
Can I install an underground downspout drain myself?
Yes, if your yard has a natural slope of at least 1%. Flat yards need professional grading wrong pitch means water pools underground and the problem gets worse, not better.
What drainage solution adds the most curb appeal?
A dry creek bed using river rocks consistently gets the best reaction from both homeowners and buyers. It looks professionally landscaped and solves real drainage problems starting at just $80.
Conclusion
Your drainage system is working every single rainy season whether you pay attention to it or not the only question is whether it’s quietly protecting your home or quietly damaging it. Pick one idea from this list that genuinely excites you, grab your materials this weekend, and just start. You don’t need a contractor, a big budget, or a perfectly mapped plan to make a real difference. Even a $50 stacked rock feature or a $30 decorative splash block is a step toward a yard that actually reflects the care you put into your home.