14 Pantry Organisation Ideas That Make Small Kitchens Look Expensive

Your pantry tells the truth about your kitchen no matter how beautiful your countertops are, a chaotic pantry drags the whole space down instantly. I’ve worked with dozens of homeowners across the US who spent serious money on kitchen renovations but left this one hardworking space completely behind. Here’s what I know for certain: good pantry organisation has nothing to do with having a massive walk-in or a designer budget. In this guide, I’m sharing 14 ideas I’ve personally used to make small, awkward pantries look intentional, high-end, and most importantly actually livable for real families.
My Design Notes
A couple of years back, I was working with a client in a rented townhouse just outside Atlanta, Georgia. She was a working mom of two kids, a tiny galley kitchen, and absolutely zero pantry to speak of just one sad upper cabinet crammed above the refrigerator. When I first walked in, I counted four open cereal boxes, two duplicate jars of peanut butter, and a mystery can with no label. We had a $180 budget and a Sunday afternoon. My solution was an IKEA KALLAX unit tucked beside the kitchen entry, a $22 over-door rack from Amazon, and three sets of matching bins from Target. I skipped the fancy matching labels and used a simple label maker instead. By Monday morning, her kitchen looked like something off a Magnolia Network episode and she texted me two weeks later saying she’d actually stopped losing groceries. That project is honestly why I believe so strongly that pantry organisation is less about the space you have and more about the system you build inside it.
Mastering Pantry Organisation: Elevated Storage Strategies That Make Every Small Kitchen Look Expensive
1. The $50 Pantry Organisation Hack That Looks Like a $500 Renovation
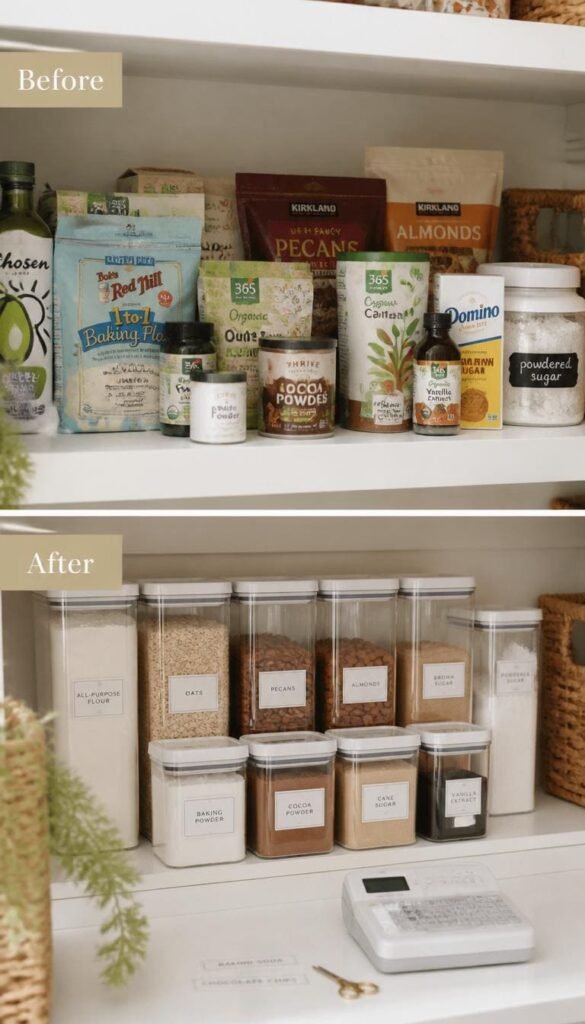
Most homeowners I talk to assume a beautiful pantry requires a custom build or hundreds of dollars in designer bins. It really doesn’t. The single biggest change you can make right now, this weekend, is swapping mismatched grocery packaging for a uniform container set. That one move alone eliminates about 70% of the visual noise instantly.
Here’s what I recommend to almost every client who’s starting fresh on a tight budget:
- Clear airtight canisters in two sizes (Target’s Brightroom line or Amazon basics both land under $40)
- A simple label maker a Brother P-touch from Walmart works perfectly
- One matching basket per shelf to catch the “doesn’t quite fit anywhere” overflow items
One thing to watch out for is buying containers before measuring your shelf depth. I’ve seen this mistake more times than I can count. A gorgeous set of tall flour jars becomes completely useless if your shelves are only 10 inches deep. Measure first. Shop second. Every single time.
2. Zone Your Pantry Like a Professional Kitchen Designer
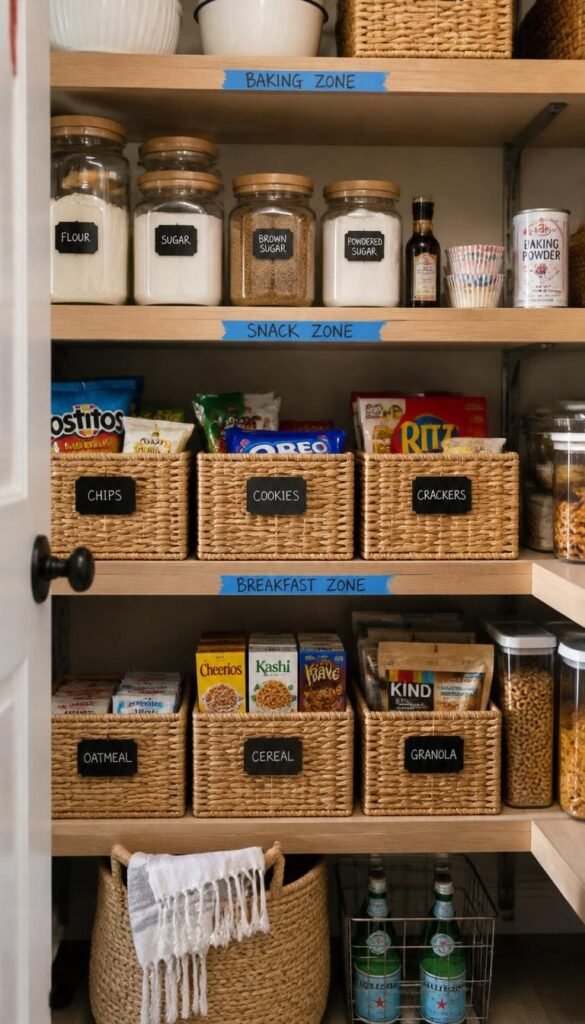
Here’s a concept I use on every project, whether it’s a high-end custom pantry or a single rented cabinet above a refrigerator. Zones. The idea is beautifully simple you stop grouping items by what they are and start grouping them by when and how you actually use them.
Think about your real morning routine. You reach for coffee, then oatmeal, then your kid’s cereal. Those three things should live within one arm’s reach of each other, not scattered across three different shelves. That’s your breakfast zone right there. The same logic applies to your baking corner, your canned goods, and your family snack stash.
A quick trick I’ve learned over years of doing this label the zone itself before you label a single container. Even a strip of painter’s tape with “Baking” written in marker keeps every person in the household aligned. No confusion, no misplaced items, no weekly reorganization sessions.
Creating zones before buying a single organizer is honestly the move that separates a pantry that stays tidy for six months from one that falls apart in six days.
3. Small Pantry Organisation Ideas That Actually Work for Tight Spaces

Small pantries are where I genuinely have the most fun as a designer. The constraint forces creativity in a way that a sprawling walk-in just doesn’t. And if you’re working with a single cabinet, a narrow closet, or a sliver of open shelving, there are some seriously smart moves available to you without touching a single wall.
Under-shelf baskets are my top recommendation for renters specifically. They clip directly onto the shelf above and create a whole second storage level underneath with zero drilling and zero damage to your deposit. A two-pack on Amazon runs about $15 and doubles your usable space in literally three minutes.
A few other small pantry wins worth knowing:
- Stackable shelf risers to build height layers inside one cabinet
- Narrow pull-out organizers that slide into the gap between a shelf and the side wall
- Magnetic spice tins mounted on a metal shelf unit — completely off the shelf surface and fully visible at a glance
Here’s the honest reality though. Wire shelves and shelf risers are a tricky combination. If your pantry has wire shelving, make sure every riser you buy has rubberized feet. Otherwise it slides the moment you reach for something and the whole system feels unstable.
4. Door Storage Is the Most Underused Pantry Organisation Space
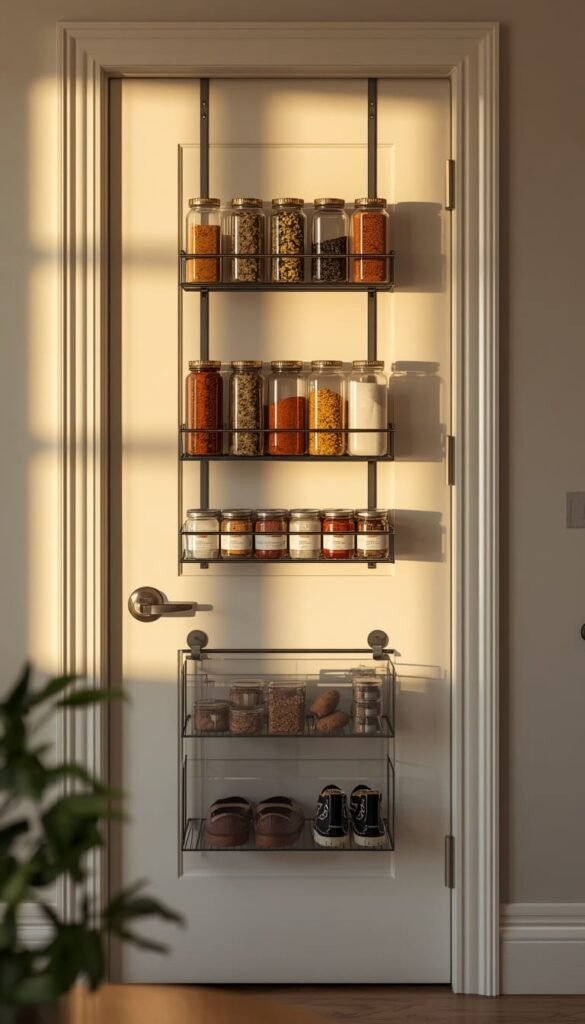
I cannot count how many pantries I walk into where the door is doing absolutely nothing. Just hanging there, completely wasted, while the shelves inside are struggling to hold everything. That door is some of the best real estate in your entire kitchen and most people never touch it.
An over-door rack with adjustable shelves can hold spice jars, small canned goods, condiment bottles, and snack packs without using a single inch of your interior shelf space. For renters, a hook-style over-door rack that requires no screws at all works beautifully and typically costs between $25 and $35 at most home stores.
If a full rack feels too bulky for your door, a clear plastic shoe organizer is one of those ideas that sounds a little silly until you actually try it. Each pocket holds individual spice packets, sauce mixes, or grab-and-go snacks for kids. It holds far more than you’d expect and keeps small items visible instead of buried at the back of a shelf where they expire quietly and unnoticed.
What I always tell my clients start treating your pantry door like a fifth wall. The moment that shift happens, you’ll never overlook it again.
Top 6 most impactful ideas:
| Idea | Estimated Price | Maintenance |
|---|---|---|
| Uniform Container Set | $40 to $80 | Medium |
| Zone System Setup | $0 to $20 | Low |
| Over Door Rack Storage | $25 to $35 | Low |
| Under Shelf Basket Add-ons | $15 to $30 | Low |
| LED Pantry Shelf Lighting | $20 to $50 | Low |
| Walk In Pantry Zone Plan | $50 to $150 | Medium |
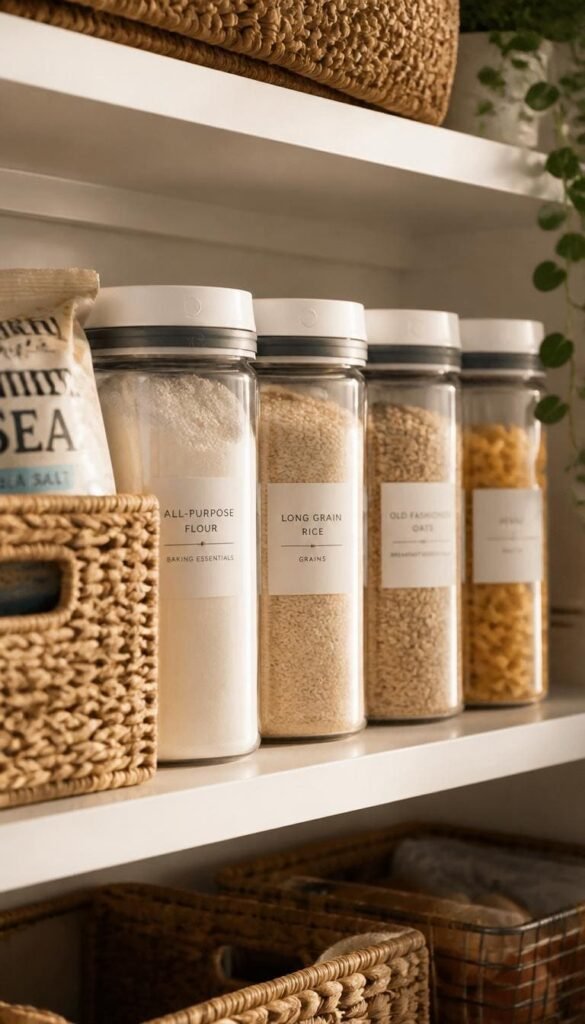
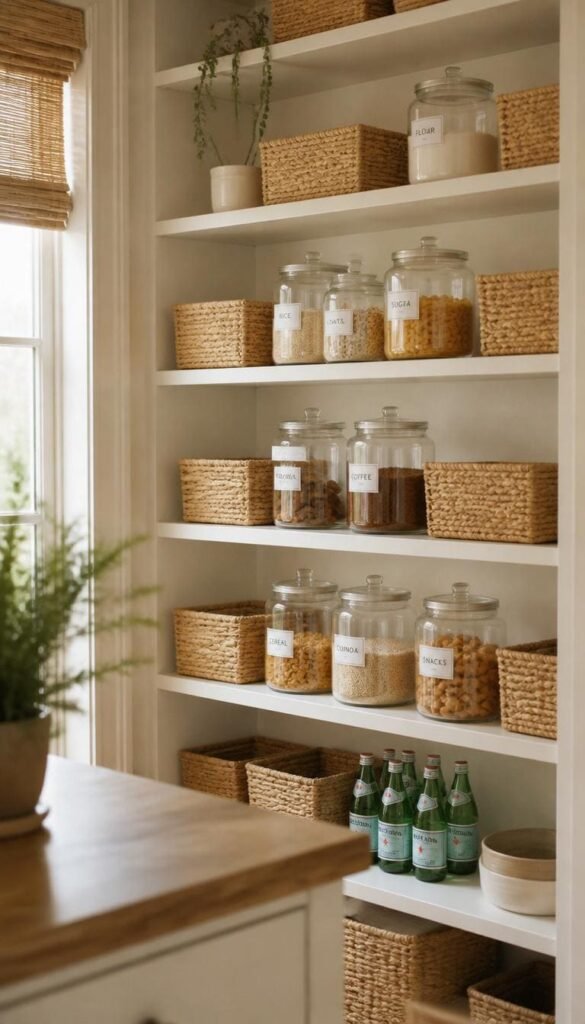
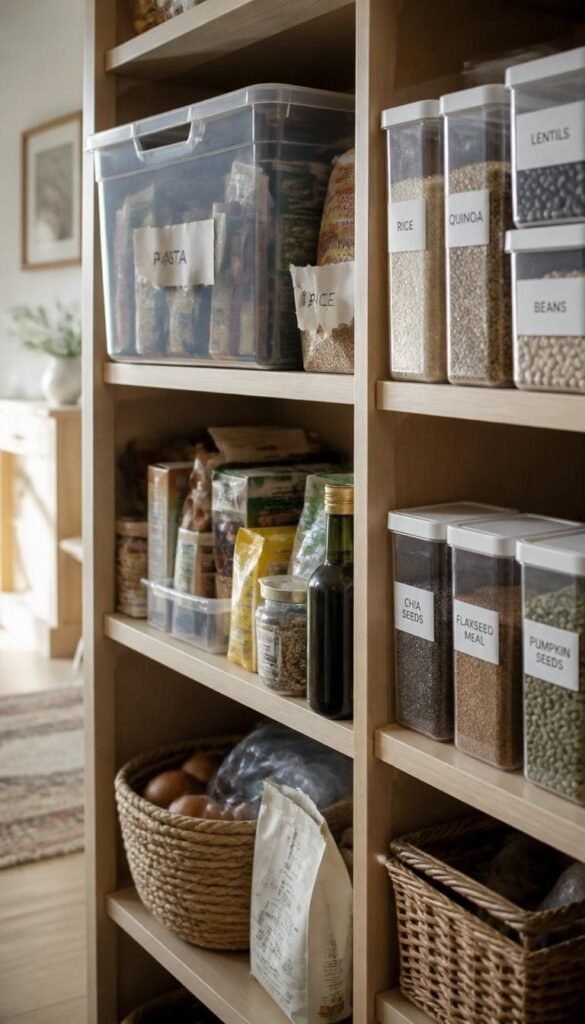
5. Pantry Container Organisation Ideas: What to Decant and What to Skip
Let me be completely honest with you about decanting because the internet makes it look far more practical than it actually is in a real, busy household. Yes, transferring your dry goods into matching clear canisters looks stunning. Yes, it makes your pantry feel instantly more expensive. But not everything deserves a jar, and buying containers for every single item in your pantry is one of the fastest ways to waste $100.
Here’s my personal rule decant anything you use weekly and refill regularly:
- All-purpose flour, sugar, brown sugar, and baking soda
- Dry pasta, rice, oats, and lentils
- Coffee beans and loose-leaf tea
- Snack mixes, nuts, and granola
Skip the containers entirely for chips, crackers, cereal, and anything with a resealable bag already built in. Transferring a bag of Doritos into a glass jar isn’t pantry organisation it’s pantry theatre. Those items go straight into a basket on a shelf, bag clipped shut, and that’s perfectly fine.
On the OXO versus Amazon dupe debate I’ve tested both extensively. OXO lids genuinely stay airtight longer and the push-button pop is satisfying in a way that sounds ridiculous but matters when you’re cooking in a hurry. The Amazon dupes work fine for dry goods that aren’t moisture-sensitive. For flour and sugar specifically, spend the extra few dollars on quality. For a basket of trail mix? Save your money.
6. Pantry Shelving and Storage Ideas That Add Visual Height
One of the most overlooked design principles in pantry organisation is the power of vertical space. Most people fill their shelves horizontally and completely abandon everything above eye level. Meanwhile, that upper zone sometimes two full feet of empty air could be holding seasonal items, backup stock, or bulky appliances that are cluttering your counters right now.
Adjustable shelving is something I advocate for loudly and often. Fixed shelves that came with your pantry were designed for an average household with average needs. Your household is not average. A quick swap to adjustable bracket shelving lets you create a tall zone for cereal boxes, a shallow zone for spice jars, and a deep bottom zone for small appliances all customized to exactly what you actually own.
For renters or anyone who cannot touch the walls, the IKEA KALLAX hack is genuinely one of my favorites. A tall KALLAX unit placed beside or near your kitchen entry becomes a freestanding pantry that you take with you when you move. Add fabric drawer inserts for the bottom cubbies, open baskets for the middle, and use the top surface for a coffee station or small appliance landing spot. Under $200 total and completely renter-friendly.
A quick trick I’ve learned with shelving always style from bottom to top in terms of weight, not just convenience. Heaviest items on the lowest shelves, lightest on top. It looks better and it’s genuinely safer.
Which zone are you tackling first your snack shelf, your baking corner, or that one chaotic catch-all basket you’ve been avoiding for months?
7. Aesthetic Pantry Organisation: How to Make It Look Magazine Worthy
Here’s where I want to be your voice of reason before you fall down a Pinterest rabbit hole at midnight buying $400 worth of matching glass jars. A magazine-worthy pantry is absolutely achievable on a real budget. But it requires understanding two things: the negative space rule and the weekly reset habit.
Negative space means leaving some breathing room on every shelf. The pantries that look expensive in photos are never packed to the absolute edge of every surface. There’s always a little gap, a little air, a visual pause between groups of items. That restraint is what reads as “intentional” instead of “stuffed.”
For the aesthetic itself, keep your container palette to two materials maximum:
- Clear glass or acrylic for anything you want to showcase
- One natural texture like woven seagrass or light wood for baskets
The reality check that nobody on Instagram will tell you this style takes a five-minute reset every single week. Without it, the aesthetic crumbles within about ten days of real family life. Build that reset into your Sunday routine and the beautiful pantry actually stays beautiful. Skip it consistently and you’ll be reorganizing from scratch every two months, which defeats the entire point.
Labels matter more in an aesthetic pantry than anywhere else. Consistent font, consistent size, consistent placement. Even a free Canva template printed on a home printer and stuck in a small clear frame looks polished and cohesive. You don’t need a calligrapher. You need consistency.
8. Pantry Lighting Ideas That Make a Small Space Feel Twice as Big
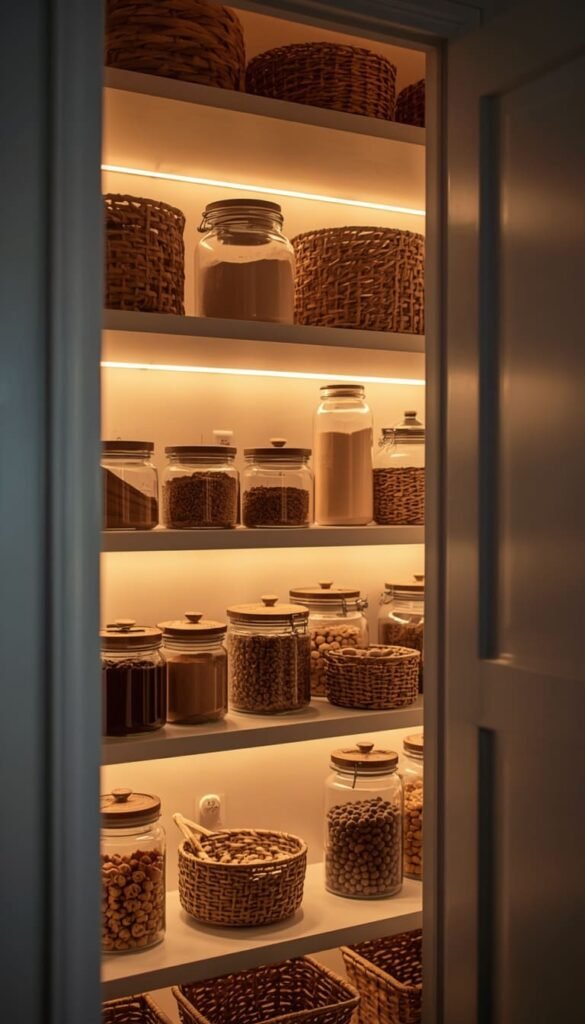
Nobody talks about pantry lighting enough and I genuinely don’t understand why. You can have the most beautifully organised pantry in the neighborhood, but if you’re squinting in the dark trying to read a label every time you open the door, the whole system breaks down. Good lighting is not a luxury in a pantry. It’s a functional necessity.
For renters or anyone on a tight budget, battery-operated LED puck lights are the single most underrated pantry upgrade available. Stick them under each shelf, and suddenly every level of your pantry is fully illuminated without a single wire or electrician involved. A six-pack runs about $20 to $25 on Amazon and the difference is immediate and dramatic.
If you’re a homeowner open to a slightly bigger project, LED strip lights tucked along the underside of each shelf create that warm, glowing pantry look you see in luxury kitchen reveals. They’re low-voltage, energy-efficient, and many are now plug-in rather than hardwired, which makes installation genuinely manageable as a weekend DIY.
One thing to watch out for is color temperature. Warm white light around 2700K to 3000K makes food look appetizing and the space feel inviting. Cool white or daylight bulbs above 4000K make your pantry feel like a convenience store stockroom. The number is right on the packaging just check before you buy.
9. Pantry Organisation Hacks for Busy Families Including a Kid Zone
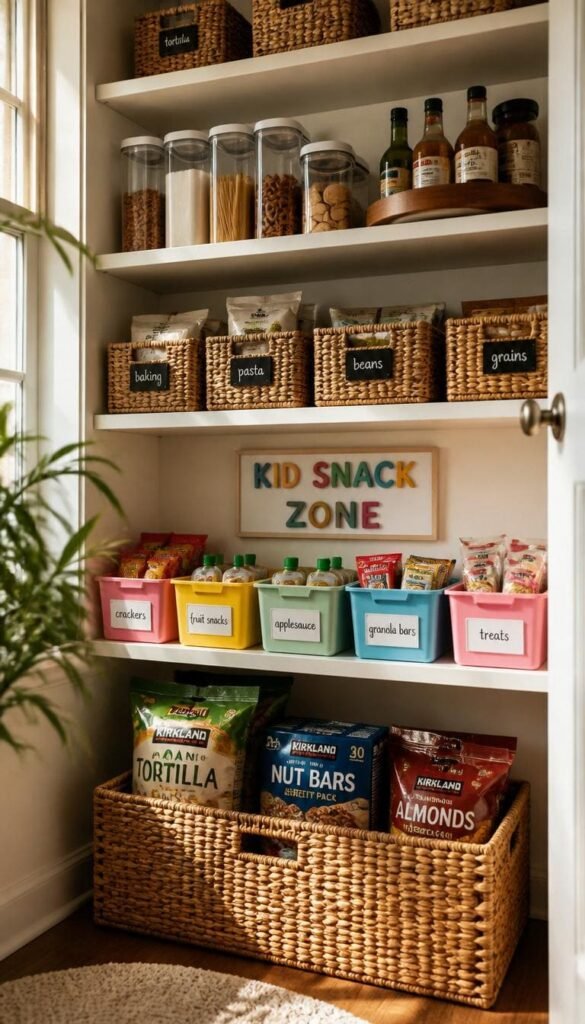
If you have children in your home, your pantry organisation strategy needs to account for small hands, independent snack missions, and the very real possibility that your beautifully labeled bins will be ransacked at 3pm every single school day. I don’t say that to discourage you. I say it because designing around your actual family life is exactly what makes the difference between a system that lasts and one that collapses by Friday.
The single most effective family pantry move I’ve ever recommended is a dedicated low shelf snack zone positioned at child height. Everything on that shelf is fair game, self-serve, and parent-approved. Kids feel independent, parents stop fielding seventeen snack requests before dinner, and the rest of the pantry stays untouched because children genuinely have no reason to dig through the baking supplies when their zone is stocked and easy to reach.
For Costco and Sam’s Club households specifically, the “one in, one out” rule is non-negotiable. Those bulk packages are generous to the point of becoming a storage crisis if you don’t manage them intentionally. My approach with clients who buy in bulk:
- Designate one deep basket on a lower shelf as the overflow holding area
- Only move items to the main organised shelves when the existing supply runs low
- Break down oversized packaging immediately after a Costco run — nobody needs a 48-pack of granola bars sitting in a cardboard box on your pantry floor
A quick trick I’ve learned with busy family pantries is to do a two-minute tidy every single evening rather than one massive weekly reset. It sounds small because it is small. But two minutes nightly keeps the system intact in a way that one frustrated Sunday afternoon reorganization never quite matches.
10. Budget Friendly Pantry Organisation Ideas Under $30 Per Shelf
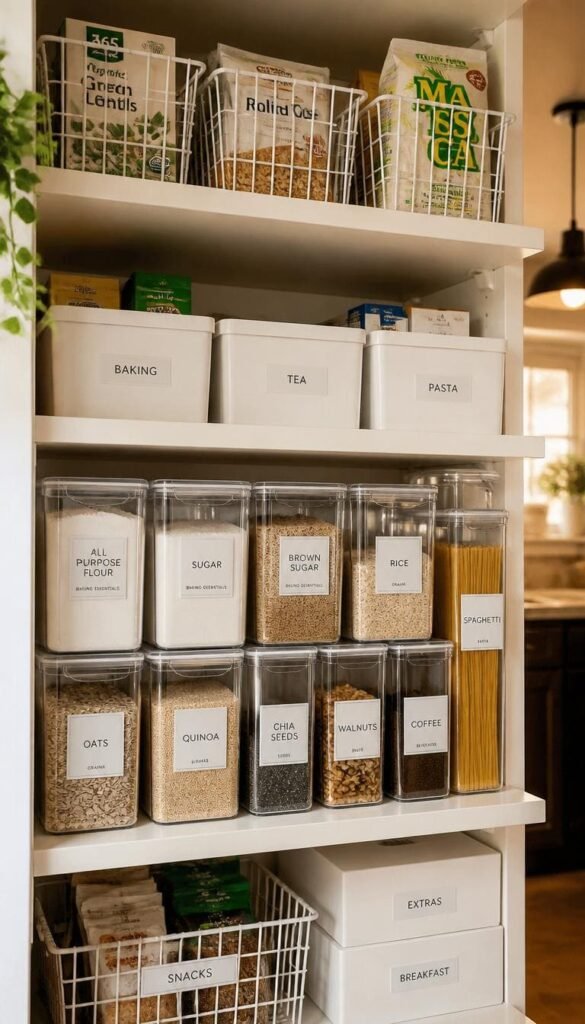
You do not need to spend a fortune to have an organised, beautiful pantry. I want to say that clearly and without any caveats because the home organisation industry does an exceptional job of convincing people otherwise. Some of my most satisfying client transformations happened on budgets that would make a designer blush.
The $30 per shelf framework is something I developed working with first-time homeowners and renters who wanted real results without the influencer price tag. Here’s how it breaks down in practice spend approximately $10 on a basket or bin for loose items, $10 on a shelf riser to add a second layer, and $10 on labels or a simple label maker. That’s one fully functional, visually cohesive shelf for thirty dollars.
Where to shop without sacrificing quality:
- Dollar Tree for baskets, small bins, and chalkboard labels — the quality is surprisingly solid for dry goods storage
- IKEA VARIERA and KUGGIS lines for stackable boxes that look clean and last for years
- Amazon Basics clear containers for decanting staples when you want the glass jar look without the glass jar price
What I’d genuinely warn you away from buying cheap is adhesive labels that aren’t waterproof. In a kitchen environment with humidity and frequent handling, a bargain label peels within three weeks and suddenly your beautiful pantry looks abandoned. Spend the extra two dollars on laminated or waterproof label sheets. That one upgrade alone keeps the whole aesthetic holding together through real daily use.
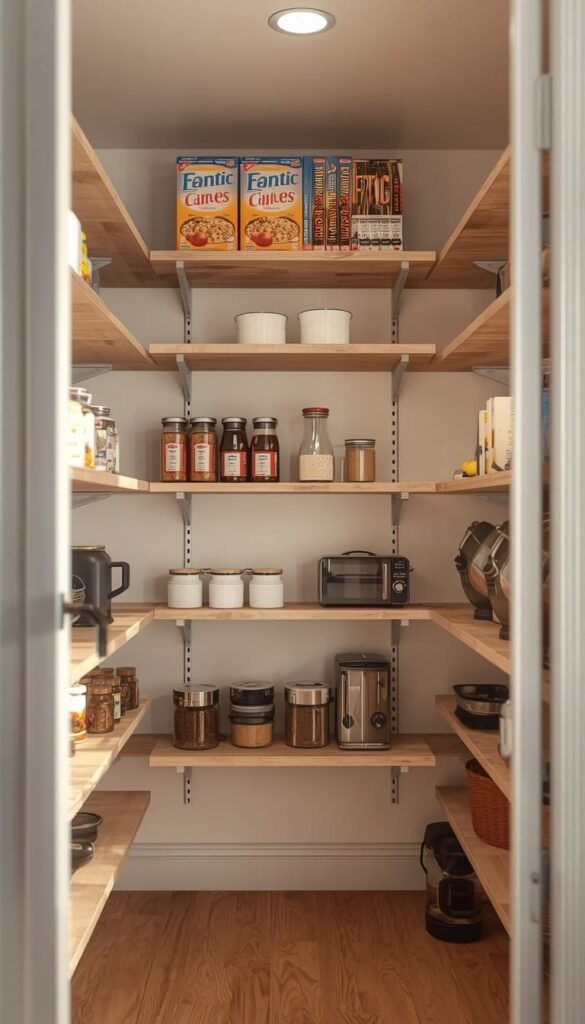
11. Walk In Pantry Organisation Inspiration Even on a Tight Budget
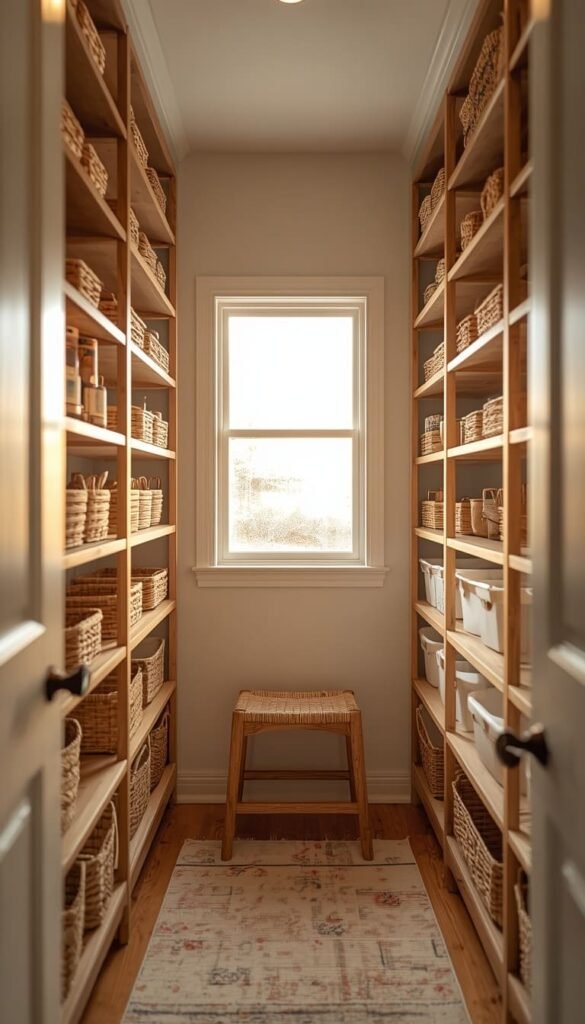
A walk-in pantry feels like an absolute luxury until you realise that more space without a system is just more room to create a bigger mess. I’ve seen stunning large pantries that were completely unusable because the extra square footage had simply become a dumping ground over time. The size of the pantry is genuinely the least important factor in how organised it actually functions.
If you’re lucky enough to have a walk-in, the floor-to-ceiling zone plan is where I’d start every single time. Map out your zones on paper before you move a single item. Think of it like planning a room layout — you wouldn’t place furniture without considering the flow of the space first.
Here’s a zone arrangement that works beautifully in most walk-in pantries:
- Eye level and arm’s reach: everyday essentials, snacks, frequently used canned goods
- Below eye level: heavier items like bulk bags, large appliances, and bulk beverages
- Above eye level: seasonal items, backup stock, and rarely used equipment
- Floor zone: large appliance storage, bulk water, or a small step stool tucked neatly in the corner
The library ladder moment you see in design magazines is genuinely gorgeous and genuinely unnecessary for most households. A well-placed two-step stool that tucks under a bottom shelf accomplishes the exact same function for about $25. Save the library ladder budget for something that will actually change how your kitchen feels daily like better lighting or quality containers at eye level where they’re always visible.
One thing to watch out for in walk-in pantries specifically is the back wall. It’s the zone people reach least often, which means it quietly becomes the graveyard for expired items and forgotten purchases. I make a point of scheduling a back-wall audit every three months with every client who has a walk-in. Set a phone reminder right now if this resonates with you.
12. Organized Pantry Shelf Inspiration The Grocery Store Method
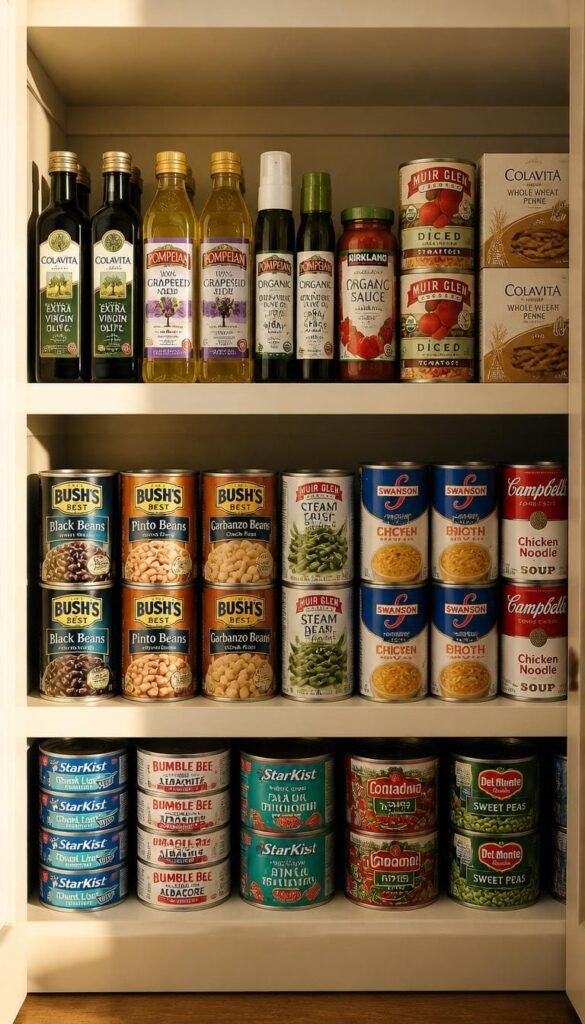
There’s a reason you can walk into any well-run grocery store and find exactly what you need within thirty seconds even though the store carries thousands of products. They follow a display logic that is so simple it almost feels obvious once you see it and yet almost nobody applies it at home.
Face every label forward. Tallest items at the back, shortest at the front. Newest items behind oldest items so nothing expires unnoticed at the back of the shelf. That’s the complete grocery store method applied to your pantry and it takes about twenty minutes to implement start to finish.
What I love about this approach is that it requires zero new purchases. No bins, no labels, no matching containers. You reorganize what you already own using a proven commercial system and the result looks intentional, clean, and easy to navigate for every single person in your household.
The impact on a can and jar collection specifically is remarkable. A shelf of canned goods that looks chaotic and overwhelming becomes immediately readable when every label faces forward and cans are grouped by category tomato products together, beans together, broths together. It works with spice jars, boxed goods, and condiment bottles equally well. This is honestly the method I recommend first to anyone who wants a better pantry but isn’t ready to spend anything yet. Start here. See the difference. Then decide if you want to invest further.
And honestly is your pantry door doing any work right now, or is it just hanging there completely wasted like most of the ones I walk into?
13. Pantry Makeover Before and After A Realistic Weekend Plan
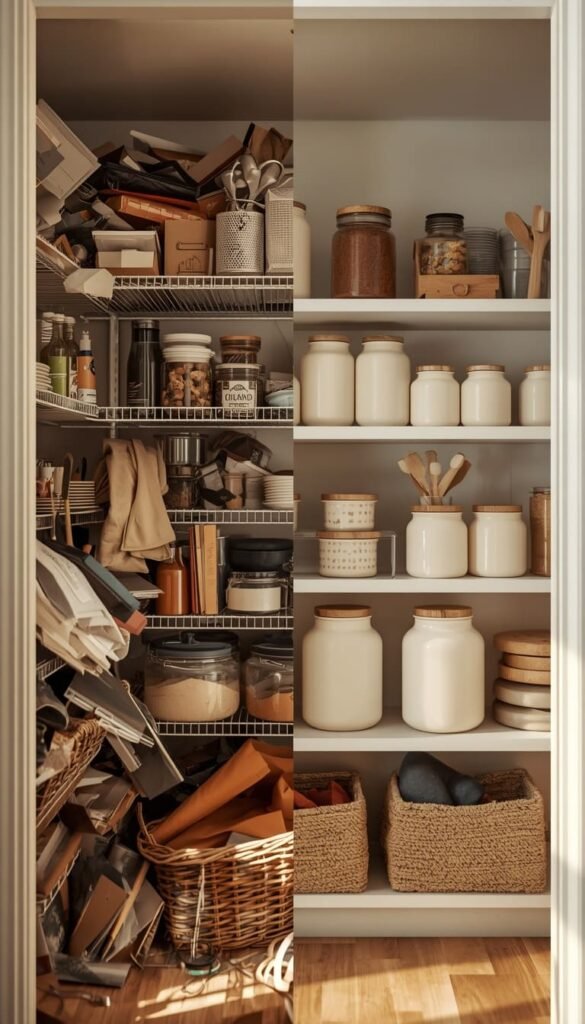
Let me set an honest expectation right here before we go any further. The pantry makeovers you see on Instagram that supposedly happen in an afternoon? They’re staged. The real process the one that actually creates a lasting system rather than a pretty photo takes a full weekend done properly. Not because it’s complicated. Because rushing the declutter phase is exactly what causes people to reorganize the same pantry three times in a single year.
Here’s how I structure a proper pantry makeover for my clients across two days:
Day One: Pull Everything Out and Make Decisions
- Remove every single item from the pantry — no halfway measures
- Check every expiration date without mercy and throw away anything past its date
- Group what remains into categories on your kitchen counter before a single item goes back in
- Measure every shelf, every door panel, and every awkward corner before you open a single shopping app
That measuring step cannot be skipped. I’ve said it before and I’ll say it again because I’ve watched too many people spend Saturday afternoon at Target and come home with beautiful containers that don’t fit a single shelf they own.
Day Two: Install, Organise, and Label
Move items back in zone by zone, not randomly. Start from the bottom shelf and work upward. Label as you go rather than at the end so nothing gets placed in the wrong zone during the process.
Realistic total time for a standard pantry closet or cabinet system — four to six honest hours across both days. For a full walk-in? Budget closer to eight. Anyone promising you thirty minutes is selling you a fantasy and setting you up for a system that won’t survive the first real grocery run.
14. Pantry Organisation Mistakes That Are Wasting Your Money
After years of working with real households across the US, I’ve watched the same mistakes appear again and again regardless of budget, kitchen size, or how motivated someone is going into the project. These aren’t small missteps. They genuinely cost people money, time, and the results they were hoping for.
The first and most expensive mistake is buying everything before measuring anything. A shopping cart full of beautiful bins means nothing if they don’t fit your actual shelves. Always measure depth, width, and height before you spend a single dollar on organisation products. This one rule alone would save American households millions of dollars a year collectively.
Over-labeling is the second mistake and it’s surprisingly common in the age of aesthetic pantry content. When everything has a label including the shelf that holds the basket that holds the snacks the system becomes high-maintenance to the point where most families quietly abandon it within a month. Label categories and zones. Let the contents speak for themselves within those zones.
The third mistake I see constantly:
- Ignoring the back wall of the pantry entirely
- Treating corner spaces as dead zones instead of opportunity zones
- Buying vertical organisers without checking that the shelf above actually has enough clearance
And the fourth one storing items based on what came in the latest grocery bag rather than where they actually belong in your zone system. It takes about thirty extra seconds to put something in the right place. It takes forty-five minutes to undo three weeks of items landing wherever they fit. The thirty seconds is always the better investment and every experienced organiser I know will tell you exactly the same thing.
The Pantry Fit Formula
By Budget
🟢 Starter Budget Under $50
- Begin with the zone system using painter’s tape — costs nothing
- Add under-shelf baskets for instant double storage ($15 to $30)
- Use a clear shoe organizer on the door for spices and packets ($10 to $15)
- Apply the grocery store facing method — completely free
- Grab LED puck lights for visibility ($20 to $25)
⭐ Investment Level $100 and Above
- Full matching container set with airtight lids (OXO or quality dupes)
- Adjustable bracket shelving customized to your actual inventory
- LED strip lighting under every shelf for a high-end finish
- IKEA KALLAX freestanding unit if you have zero pantry space
- Matching labeled bins across every zone for a cohesive pulled-together look
By Lifestyle
👨👩👧 Busy Families
- Dedicated low shelf kid snack zone — non-negotiable
- One in, one out rule for every Costco run
- Two-minute nightly tidy instead of weekly overhaul
- Skip glass containers — durable wipe-clean bins only
🌿 Minimalists and Small Space Dwellers
- Leave breathing room on every single shelf
- Decant weekly-use items only — skip the rest
- Maximum two materials in your container palette
- Five-minute Sunday reset keeps the aesthetic intact all week
Frequently Asked Questions
How do I organise a small pantry on a tight budget?
Start with zones and the grocery store facing method both cost nothing. Add under-shelf baskets ($15) and an over-door rack ($25) and you have a fully functional system under $50.
What are the best containers for pantry organisation?
OXO airtight canisters are worth every penny for flour, sugar, and moisture-sensitive staples. For everything else, Amazon basics work just fine.
How often should I completely clean out my pantry?
Ideally, a full pull-everything-out reset every three months. A two-minute nightly tidy handles the day-to-day so those quarterly sessions stay manageable.
How do I keep my pantry organised with young kids at home?
Create one dedicated low shelf snack zone that kids can access independently. When children have their own clearly defined zone, they stop disrupting the rest of the system entirely.
What is the very first step to organising a messy pantry?
Pull everything out before buying a single organiser. Most people shop first and wonder why nothing fits measuring and decluttering first saves both money and frustration.
Conclusion
Your kitchen is where your family starts every single morning and ends every single evening it deserves to feel calm, functional, and genuinely yours. You don’t need a bigger pantry, a renovation budget, or a free weekend to start seeing real change. Pick one shelf today, clear it out, measure it, and make one intentional decision about what belongs there. That single shelf becomes the proof that the whole system is possible, and trust me, the momentum that follows is real. So tell me what’s the one pantry problem that drives you absolutely crazy every time you open that door?
Drop it in the comments and let’s figure it out together.