16 Outdoor Kitchen DIY on a Budget Ideas That Look Expensive
You don’t need a massive budget or a contractor’s phone number to have a beautiful outdoor kitchen in your backyard. Some of the most stunning DIY outdoor kitchen builds I’ve seen across the USA were pulled off for under $500 using cinder blocks, reclaimed wood, and a little weekend hustle. I’ve helped homeowners in Austin, Phoenix, and Charlotte transform bare patios into fully functional cooking and entertaining spaces without draining their savings. If you’re searching for outdoor kitchen DIY on a budget ideas that actually look expensive, you’re in exactly the right place. Let’s get into it.
My Design Notes
A few years back, I worked with a couple in Austin, Texas who had exactly $600, a narrow 10-foot side yard, and a serious love for weekend grilling. Nobody thought it was possible to build a real outdoor kitchen in that space for that money. We sourced cinder blocks from Home Depot, found a gorgeous butcher block countertop on Facebook Marketplace for $40, and used their existing Weber grill as the centerpiece. One full weekend of work, a little sweat, and honestly a lot of laughs later they had a fully functional backyard kitchen that their neighbors genuinely thought was professionally built. That project changed how I approach every budget outdoor kitchen consultation I take on. It taught me that creativity and smart sourcing will always beat a big budget. Every single idea in this article is inspired by real builds just like that one.
Stunning Budget Outdoor Kitchen DIY Ideas That Transform Your Backyard Without Breaking the Bank
1. Cinder Block Outdoor Kitchen DIY on a Budget That Costs Under $300
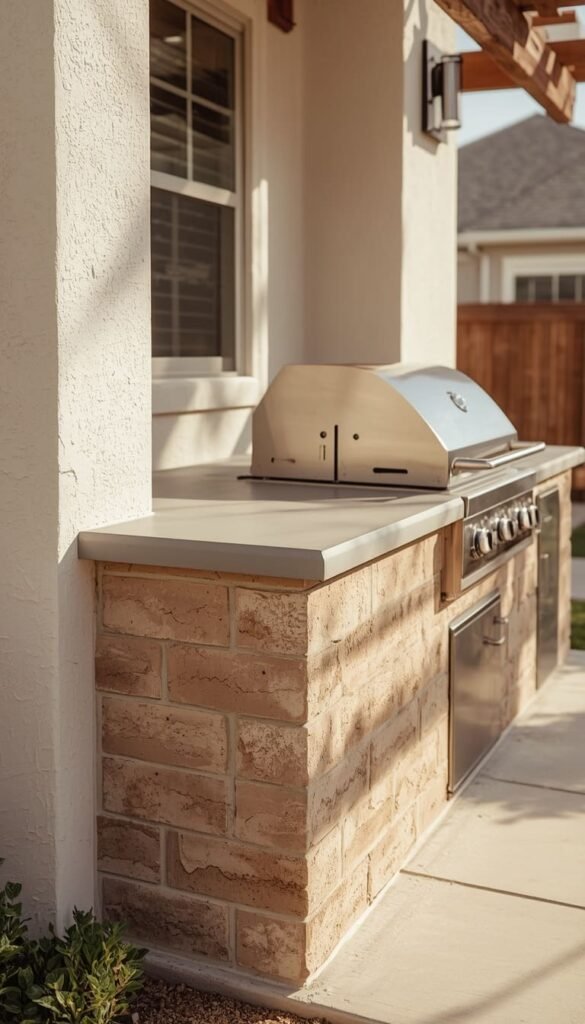
Cinder blocks are honestly one of the best-kept secrets in the budget outdoor kitchen world. They’re sturdy, weather-resistant, and cost around $1.50 to $2.50 per block at Home Depot or Lowe’s. A basic grill surround with counter space on both sides typically needs 40 to 60 blocks so you’re looking at $60 to $150 in materials just for the structure. That’s a foundation most people can actually afford.
What I love most about cinder block builds is how finished they look once you add a surface treatment. A coat of stucco, stone veneer panels, or even exterior-grade paint takes these blocks from “construction site” to “custom kitchen” in a single afternoon. I’ve seen homeowners spend $80 on a bag of stucco mix and completely fool their dinner guests.
A quick trick I’ve learned on real projects always dry-stack your blocks first before committing to mortar. This lets you adjust the layout, test your grill fit, and catch mistakes before they’re permanent.
- Fill block cores with rebar and concrete for added stability in windy regions
- Cap the top with a poured concrete or tile countertop for a clean finished look
- Seal everything with a masonry sealer to protect against moisture and freeze-thaw cycles
2. Pallet Wood Grill Station The Most Affordable DIY Outdoor Kitchen Build
If there’s one material that screams “budget backyard kitchen” and still manages to look rustic-chic, it’s reclaimed pallet wood. You can often source pallets for free from local hardware stores, garden centers, or Facebook Marketplace. A full grill station frame can be built from 4 to 6 pallets making this potentially the cheapest build on this entire list.
One thing to watch out for is pallet grading. Always look for pallets stamped “HT” which means heat-treated and safe for outdoor use. Avoid any stamped “MB” that stands for methyl bromide, a chemical treatment you absolutely don’t want near your food prep area. Seal the wood with an exterior-grade polyurethane or teak oil to protect it from rain and UV damage. With the right finish, a pallet grill station can easily last 3 to 5 seasons.
3. L Shaped Budget Outdoor Kitchen Design for Small Backyards
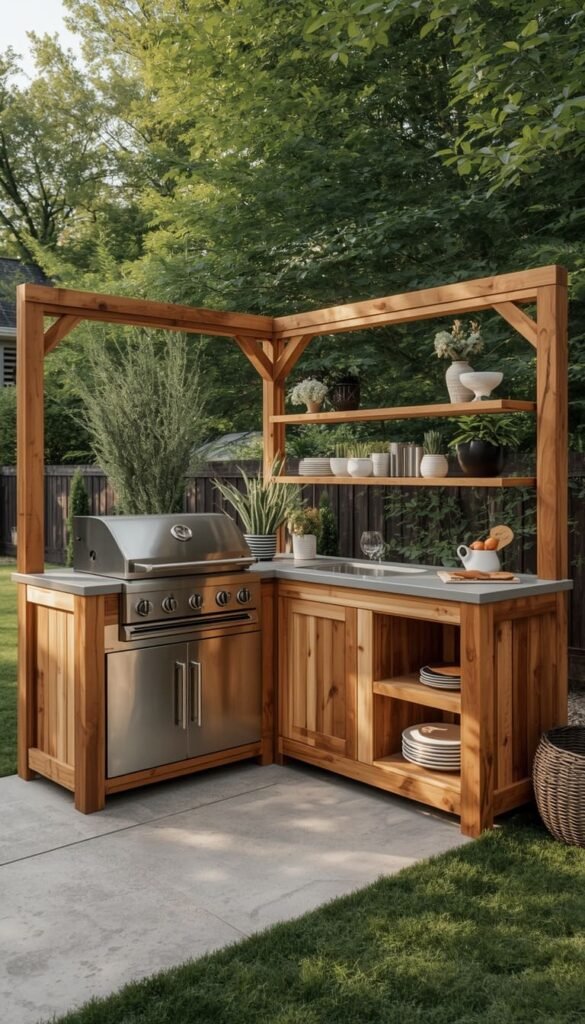
An L-shaped layout is genuinely one of the smartest moves you can make in a small backyard. It tucks neatly into any corner whether that’s a patio corner, a deck edge, or where your fence meets your house wall and it immediately doubles your counter space without doubling your footprint. I always recommend this layout first to homeowners working with yards under 400 square feet.
The beauty of building an L-shaped outdoor kitchen DIY on a budget is that you can phase it. Build one arm of the L first the grill station side and add the second arm with the prep and storage side a few months later when your budget allows. No one says it all has to happen in one weekend.
- Use cedar or pressure-treated lumber for the frame to keep costs low and durability high
- Add open shelving on the inner corner to maximize that often-wasted corner space
- A concrete board countertop with tile finish runs about $3 to $6 per square foot gorgeous and affordable
4. Modular DIY Outdoor Kitchen Using Stock Cabinets from IKEA
This one surprises people every single time. IKEA’s SEKTION base cabinets when paired with exterior-grade paint, marine-grade plywood backing, and a concrete or butcher block countertop make an incredibly convincing outdoor kitchen for a fraction of custom build costs. I’ve seen full setups completed for under $800 using this exact approach.
The key is preparation. Stock cabinets are not built for outdoor exposure by default, so you need to seal every edge and surface with an exterior waterproof primer before assembly. Pay special attention to the cabinet backs and bottoms where moisture tends to creep in first.
Place them under a pergola or covered patio to extend their lifespan significantly. Direct rain exposure without overhead coverage will shorten any wood-based cabinet life regardless of how well you seal them. Pair with stainless steel hardware for a polished, cohesive look that genuinely reads as high-end.
Top 6 budget outdoor kitchen DIY ideas:
| Idea | Estimated Price | Maintenance |
|---|---|---|
| Cinder Block Outdoor Kitchen | $60 to $150 | Low |
| Pallet Wood Grill Station | $0 to $80 | Medium |
| Concrete Countertop Build | $50 to $150 | Low |
| Cedar Wood Outdoor Kitchen | $200 to $400 | Low |
| Tile Countertop Kitchen | $40 to $120 | Low |
| Pergola Roof Backyard Kitchen | $200 to $500 | Medium |
5. Concrete Countertop DIY Outdoor Kitchen That Looks Like a Million Bucks
Concrete countertops are having a serious moment in American backyard design right now and the best part is that DIYing one costs a fraction of what you’d pay a fabricator. A poured concrete countertop for a standard grill station runs about $50 to $150 in materials depending on size. A professional would charge you $1,500 or more for the same surface. That gap is where the magic lives.
The process is more forgiving than most people think. You build a simple melamine mold, mix your concrete, pour it, and let it cure for 48 to 72 hours. Adding a concrete stain or dye before the pour gives you that gorgeous charcoal, warm sand, or slate gray finish that looks completely custom. One thing to watch out for is air bubbles tap the mold firmly and repeatedly during the pour to release them before the concrete sets.
Seal the finished surface with a food-safe concrete sealer rated for outdoor use. Reseal once a year and this countertop will outlast almost everything else in your backyard.
Which of these budget outdoor kitchen ideas fits your backyard best the cinder block build, the cedar wood setup, or the portable grill station on wheels?
6. Budget Outdoor Kitchen With Grill Island Using Leftover Pavers
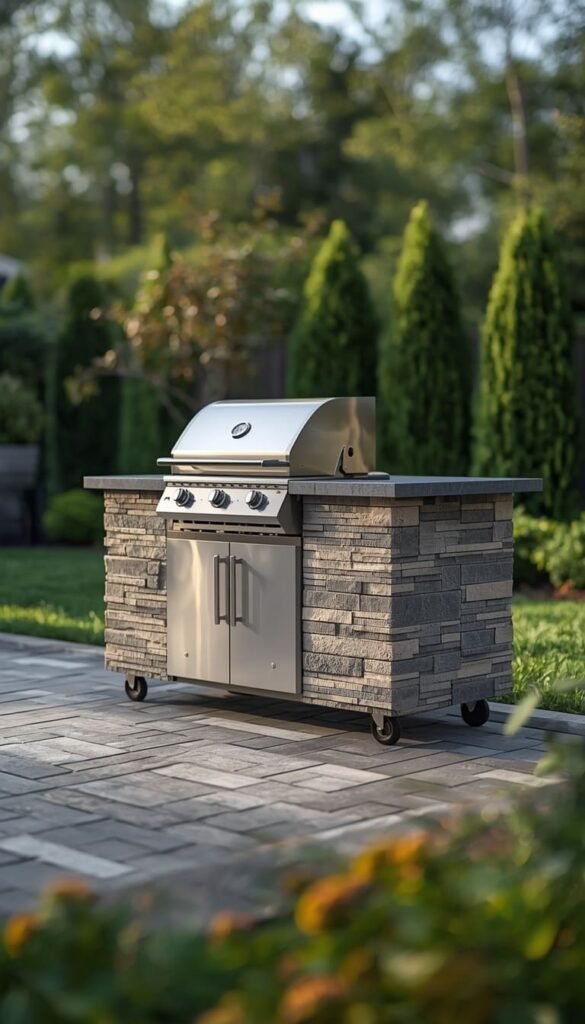
Got leftover pavers from a patio project sitting in your garage? You just found your grill island base. Stacking and mortaring pavers into a solid kitchen island is one of the most satisfying budget outdoor kitchen builds out there and the results look genuinely custom. Pavers run about $0.50 to $3.00 each depending on style, so even buying new ones keeps the budget very manageable.
A quick trick I always share with clients use a combination of standard concrete pavers for the structural core and a more decorative paver or stone veneer on the exterior face. You get the strength of a solid build with the visual appeal of a high-end finish, without paying high-end prices for every single block.
- Standard island size of 4 feet by 2 feet needs roughly 80 to 120 pavers depending on thickness
- Mortar joints should be tooled smooth for a cleaner finished appearance
- Top with a bluestone or porcelain tile slab for a truly elevated look
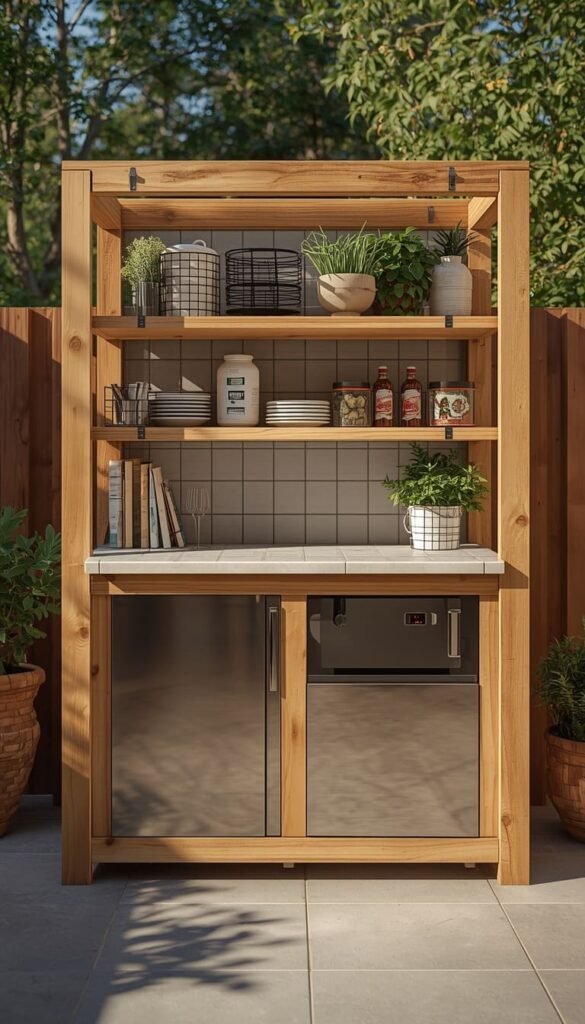
7. Small Outdoor Kitchen DIY With a Mini Fridge and Smart Storage
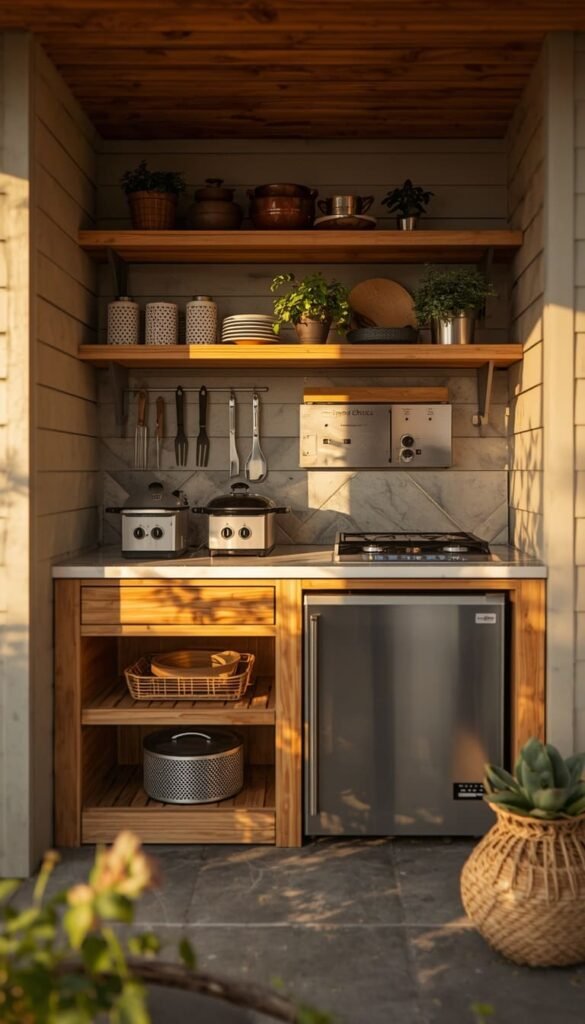
Small does not mean compromised. Some of the most functional outdoor kitchens I’ve ever designed were under eight feet long and this idea proves exactly that. The secret is treating every inch like prime real estate. A compact grill, a mini outdoor-rated fridge, and two levels of open shelving can give you everything you need to cook and entertain without a sprawling footprint.
When it comes to storage, think vertically. Wall-mounted magnetic strips hold grilling tools. Open shelves built from cedar boards and pipe fittings cost about $30 to make and look industrial-chic. A pegboard panel painted in a weather-resistant color adds even more organized storage for under $25.
The mini fridge piece is worth investing in slightly. An outdoor-rated mini fridge designed to handle temperature swings runs $150 to $250 and is absolutely worth the extra spend over a standard indoor unit. Indoor fridges placed outside fail within one to two seasons in most US climates. That’s a lesson I’ve watched too many homeowners learn the hard way.
8. DIY Outdoor Kitchen Using a Repurposed Potting Bench Under $150
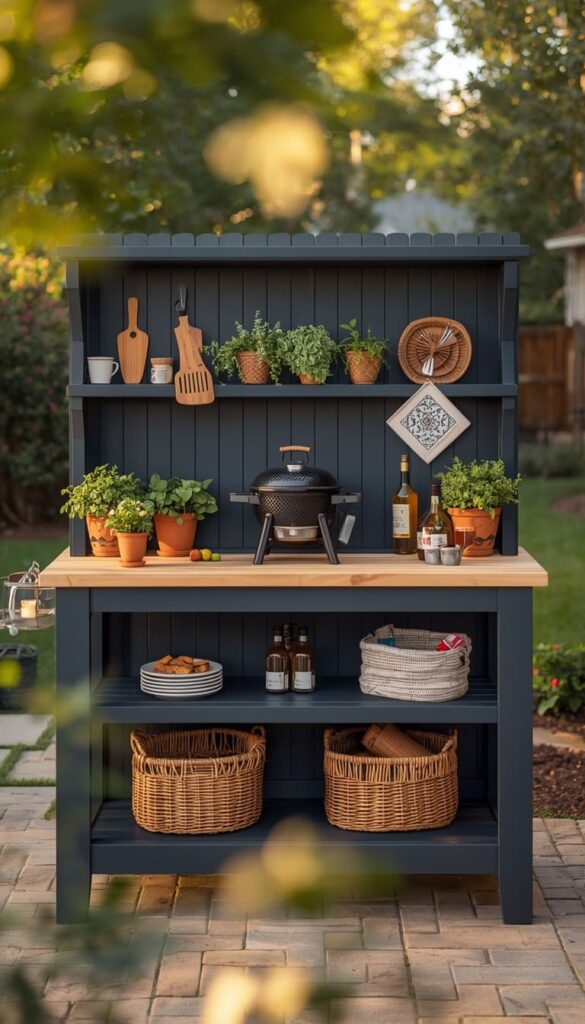
This is one of my absolute favorite budget ideas because it requires zero construction skills and delivers maximum charm. A sturdy wooden potting bench the kind you find at garden centers, HomeGoods, or even thrift stores already has the bones of a perfect outdoor kitchen station. It has a work surface, lower shelves, and sometimes even a built-in sink cutout.
Sand it down, prime it, and finish it with an exterior-grade paint in a color that complements your home’s palette. Navy, forest green, and matte black are all having a major moment in American backyard design right now. Drop in a portable butane burner or a small tabletop grill and you have a fully functional DIY patio kitchen that genuinely looks intentional and styled.
The total cost for this build? Often under $100 if you source the bench secondhand. Under $150 even if you buy new. It’s the kind of weekend project that takes four hours and earns you compliments all summer long.
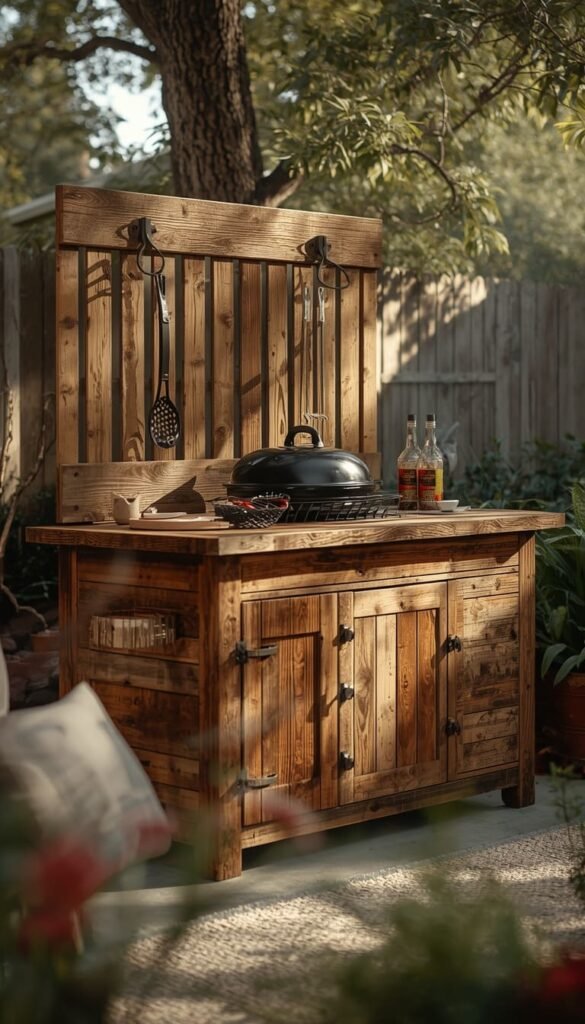
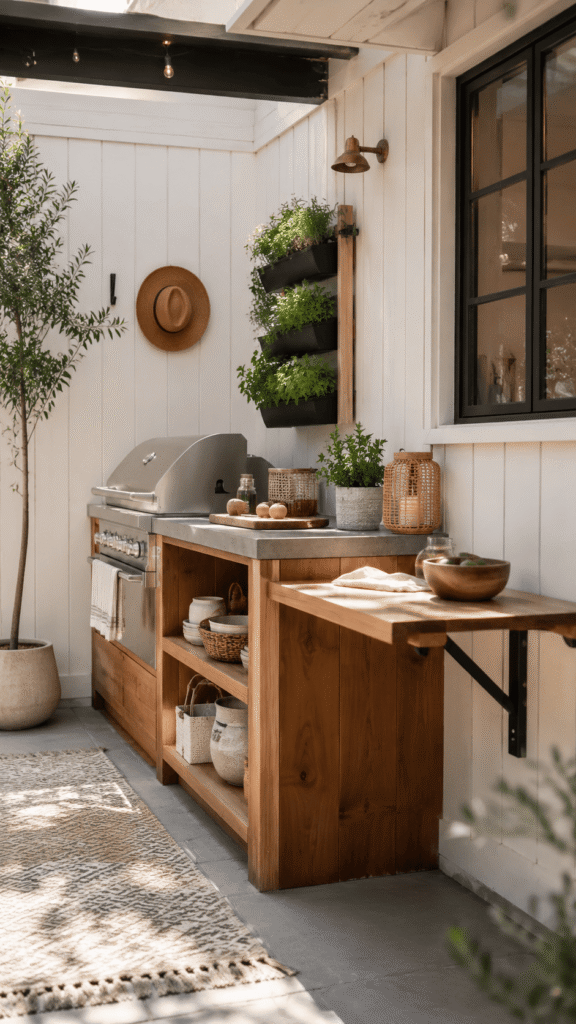
9. Rustic Outdoor Kitchen With Reclaimed Wood and Stone Veneer
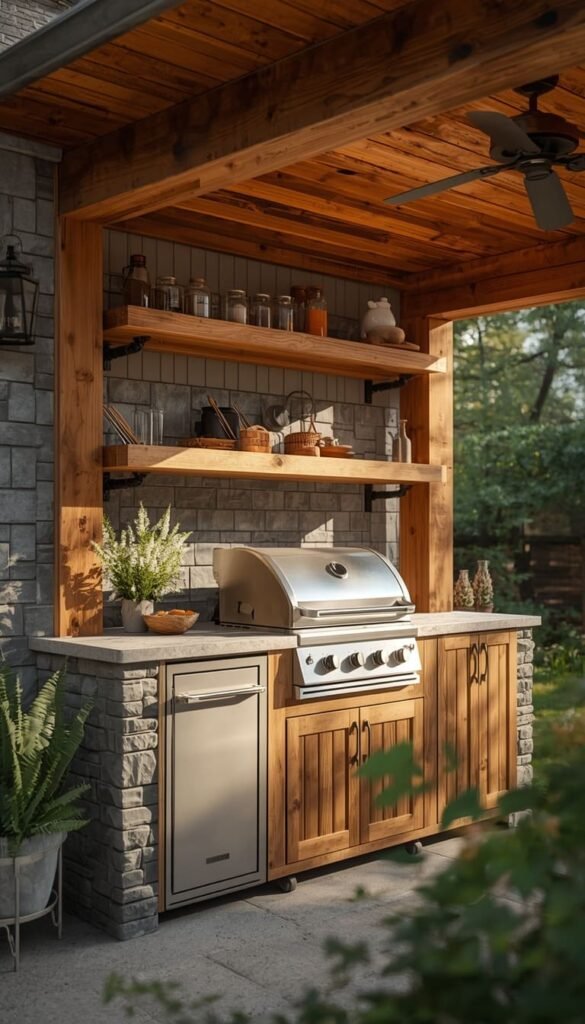
There is something about a rustic outdoor kitchen that feels deeply American warm, welcoming, and built to last. Reclaimed wood and stone veneer are the two materials that deliver that look most convincingly, and the good news is that both are incredibly affordable when you know where to shop. Habitat for Humanity ReStores, salvage yards, and Facebook Marketplace are goldmines for reclaimed lumber at $0.50 to $2.00 per linear foot.
Stone veneer panels the kind that adhere directly to a cinder block or plywood substrate run about $6 to $12 per square foot at most home improvement stores. Apply them to the face of your kitchen structure and the visual upgrade is immediate and dramatic. I’ve used this exact combination on projects in Tennessee and the Carolinas where that rustic aesthetic fits the landscape perfectly.
- Pair warm-toned cedar shelving with a cooler gray stone veneer for beautiful contrast
- Use black iron pipe brackets for open shelving — incredibly sturdy and very on-trend
- Finish wood surfaces with a semi-transparent exterior stain rather than solid paint to let the natural grain show through
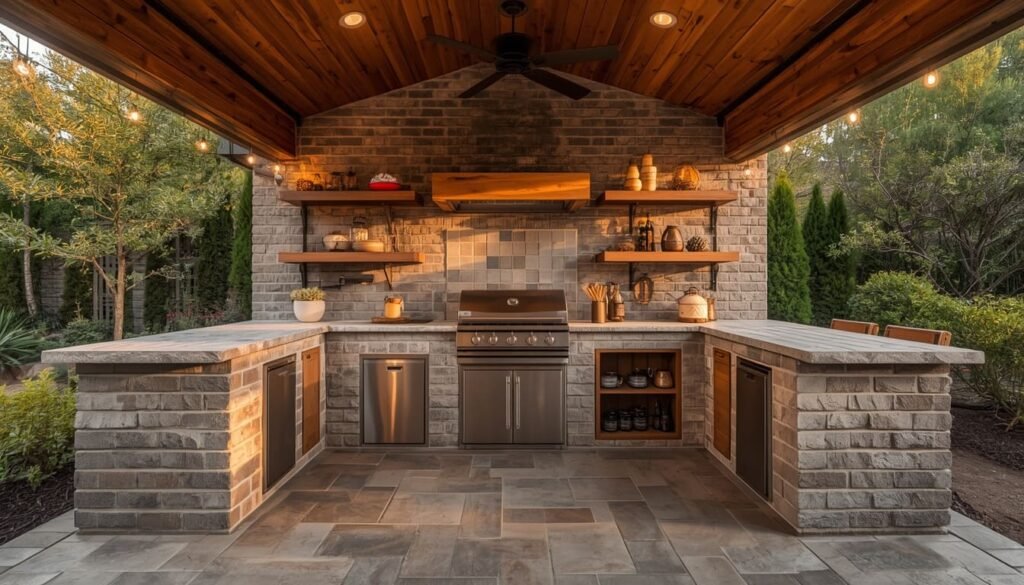
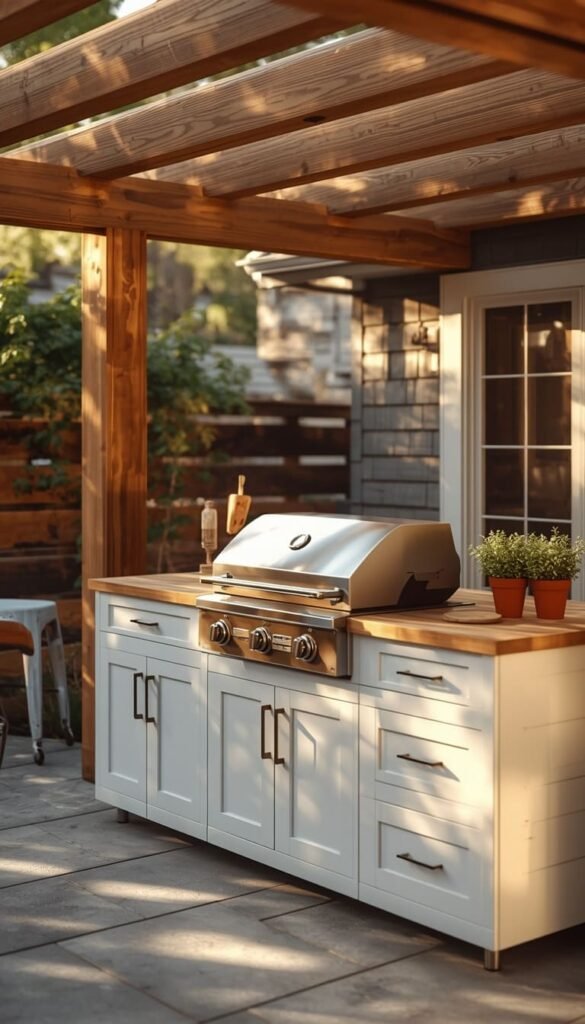
10. Budget Friendly Backyard Kitchen With a Pergola Roof for Under $500
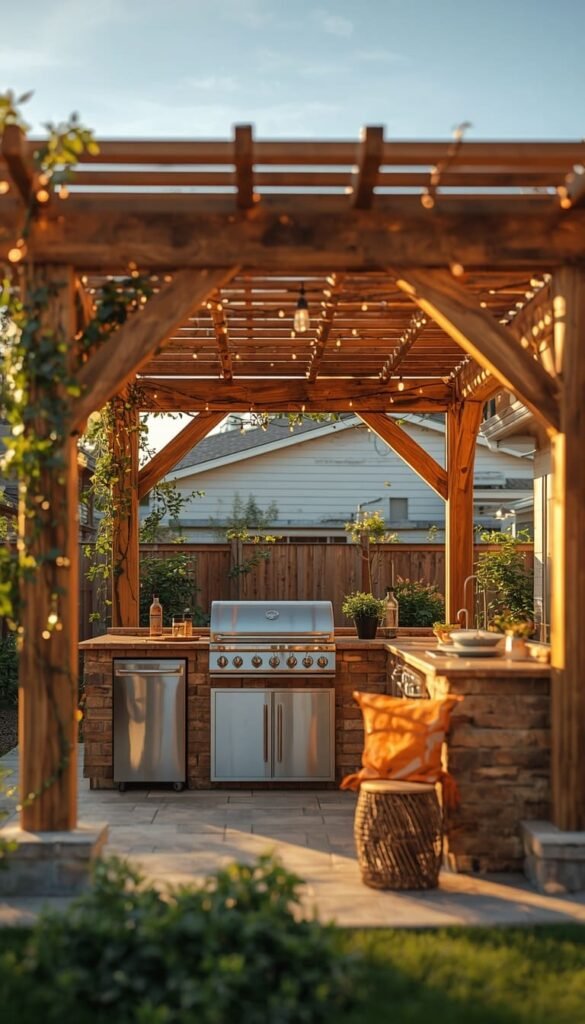
Adding a pergola over your outdoor kitchen does three things at once it provides shade, defines the cooking zone as its own intentional space, and makes the entire setup look significantly more expensive than it cost to build. A simple four-post cedar pergola kit from a home improvement store runs $200 to $350. Build it yourself over a weekend and your outdoor kitchen suddenly looks like a feature, not an afterthought.
I always tell clients that the pergola is the single highest-impact upgrade you can add to a budget backyard kitchen. It frames the space. It creates atmosphere. String lights draped across the beams cost $20 and completely transform the evening entertaining experience. This is the kind of detail that makes guests ask “did you hire someone for this?”
One thing to watch out for with pergola kits is post anchoring. In regions that experience high winds coastal areas, the Midwest, parts of Texas make sure posts are anchored into concrete footings rather than just surface-mounted. It adds a couple of hours to the build but protects your investment for years.
Have you ever repurposed or upcycled any material for a home project before, and would you try it for your outdoor kitchen?
11. Portable DIY Grill Station on Wheels Cook Anywhere Spend Less
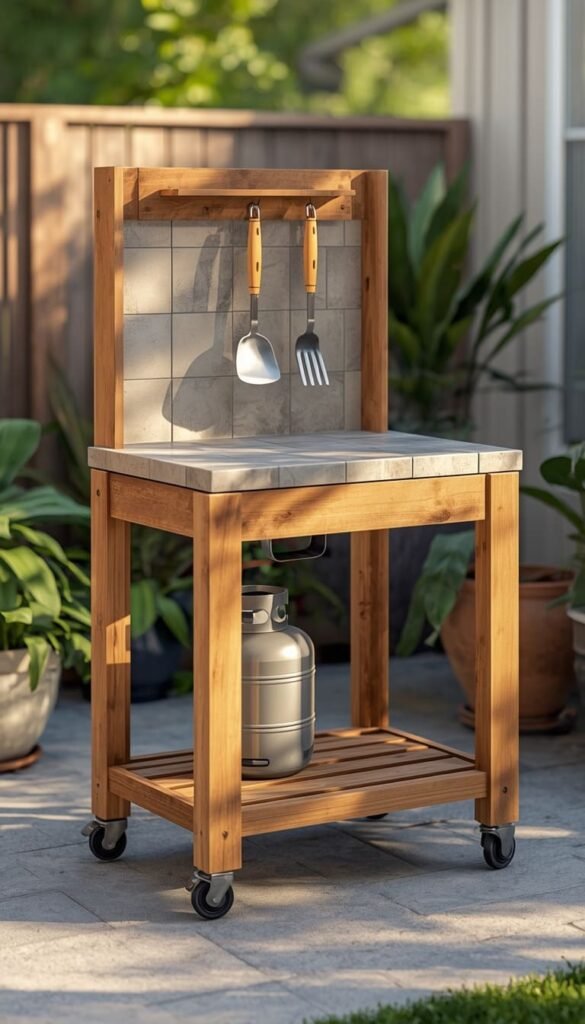
Not every great outdoor kitchen is a permanent structure and honestly, for a lot of American homeowners, a well-built portable grill station on wheels is the smarter, more flexible choice. You can move it for parties, wheel it under cover during bad weather, and take it with you if you ever move homes. The freedom that comes with a portable setup is genuinely underrated.
Building one from scratch is surprisingly straightforward. A simple frame built from 2×4 pressure-treated lumber, a set of locking caster wheels from the hardware store, and a plywood or tile work surface is all you need. Total material cost runs $80 to $180 depending on size and finish choices.
Add a hook rail along the back for tongs, brushes, and spatulas. Build in a lower shelf for propane storage or a small cooler. Finish with exterior paint in a color you love and you have a mobile outdoor kitchen that works just as hard as any permanent build sometimes harder.
12. Tile Countertop DIY Outdoor Kitchen Cheap Durable and Stunning
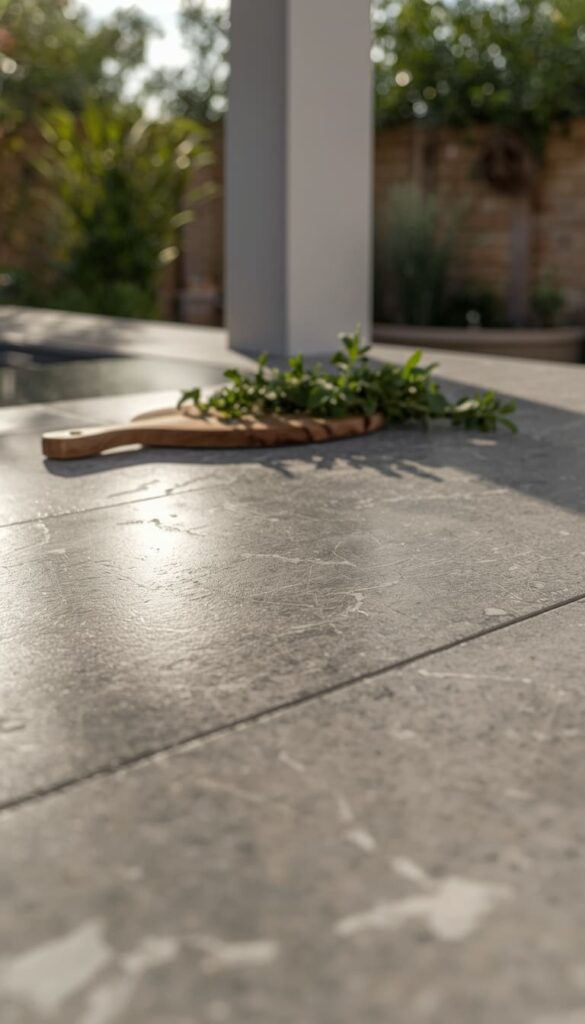
If I had to recommend one countertop solution for almost every budget outdoor kitchen build, it would be tile. Full stop. Outdoor-rated porcelain or ceramic tile is incredibly durable, completely weather-resistant, and costs as little as $1.50 to $4.00 per square foot. For a standard 6-foot countertop, your total tile spend might be $40 to $80. That is genuinely hard to beat.
The installation process is beginner-friendly too. Apply a layer of cement board over your substrate, spread tile adhesive, lay your tiles, grout, and seal. The whole process for a small countertop takes about four to six hours including dry time.
Where the magic really happens is in your tile selection. Large format tiles in a concrete or marble look give a countertop a high-end appearance that most guests would never suspect came from a home improvement store clearance bin. A quick trick I’ve learned shop the clearance and overstock sections first. You can often find premium tiles at 60 to 80 percent off simply because a contractor ordered too many for a project.
13. Cedar Wood Outdoor Kitchen Plans DIY That Weather Every Season
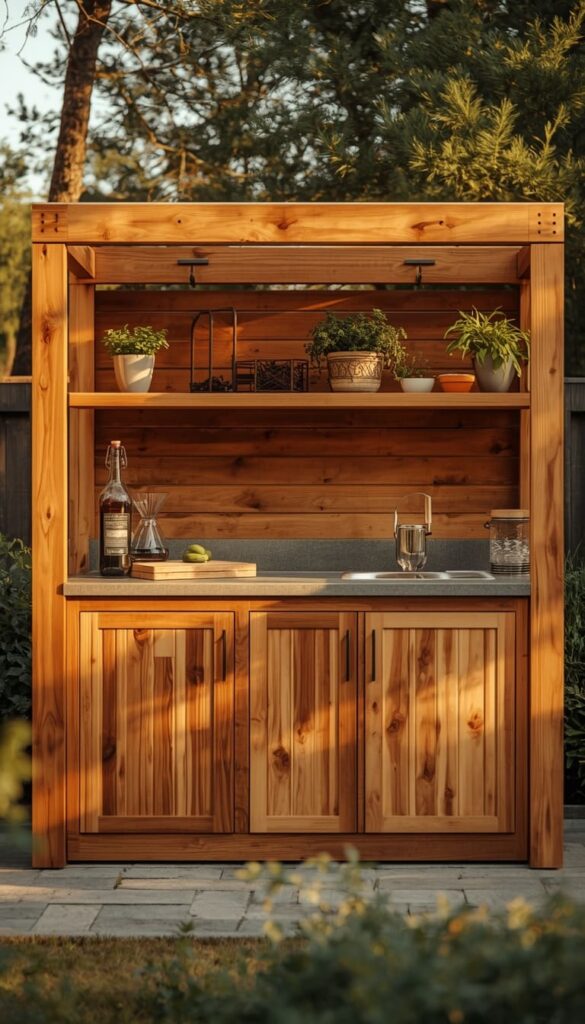
Cedar is one of those materials that genuinely earns its reputation in outdoor builds. It is naturally rot-resistant, handles moisture beautifully, and smells incredible during those first warm weekends of the season. For a budget outdoor kitchen frame, cedar strikes the perfect balance between affordability and longevity. Rough-cut cedar boards run about $1.50 to $3.00 per linear foot at most lumber yards significantly less than composite alternatives.
What makes cedar especially appealing for DIY outdoor kitchen plans is how forgiving it is to work with. It cuts cleanly, holds screws well, and sands to a beautiful finish even for beginners. I’ve worked with homeowners who had never picked up a circular saw before and still produced stunning cedar kitchen frames on their first build.
Finish your cedar structure with a penetrating oil sealer rather than a film-forming paint. This feeds the wood from inside, enhances the natural grain, and allows the wood to expand and contract seasonally without cracking or peeling. Reapply every one to two years and your cedar kitchen will genuinely improve with age developing that beautiful silvery patina that looks like it belongs in an Architectural Digest backyard spread.
- Use cedar for the frame and open shelving but opt for tile or concrete on the countertop surface for maximum durability
- Pre-drill all screw holes to prevent splitting — cedar is soft and splits more easily than pressure-treated pine
- Apply sealer within 48 hours of completing the build before the wood weathers unevenly
14. Freestanding Backyard BBQ Station With Built In Storage Shelves
A freestanding BBQ station is the outdoor kitchen idea that works for absolutely everyone renters, homeowners with small yards, people who aren’t ready to commit to a permanent structure, and anyone who wants a finished-looking setup without a full weekend of construction. The concept is simple: one self-contained unit that holds your grill, gives you prep space, and stores everything you need within arm’s reach.
The built-in storage piece is what separates a good BBQ station from a great one. Think two levels of open shelving below the counter for propane tanks, grilling tools, and entertaining supplies. Add a small closed cabinet section with a simple latch door for items you want protected from the elements. This level of organization makes the whole space feel intentional and designed rather than thrown together.
Building this freestanding structure from scratch using 2×4 lumber and cement board costs roughly $150 to $250 in materials. That includes the frame, shelving, and a tile or concrete countertop finish. The result is something that looks custom-built and costs less than most people spend on a single patio furniture piece.
15. DIY Patio Kitchen in a Courtyard Making 6 Feet Work Hard
Six feet sounds limiting until you see what a thoughtful layout can accomplish in that space. Courtyard kitchens those compact, beautifully contained cooking zones tucked into enclosed outdoor areas are some of the most charming and functional setups I’ve ever designed. The enclosed nature of a courtyard actually works in your favor because every wall becomes a potential surface for storage, shelving, or visual interest.
In a 6-foot footprint, the layout priorities are clear. Grill on one end, prep surface in the middle, storage and serving space on the other end. Wall-mounted shelving above the counter adds vertical storage without eating into your floor space. A fold-down shelf bracket on one side gives you an extendable surface for serving during parties that tucks completely flat when not in use one of my favorite space-saving tricks for small outdoor kitchen builds.
The styling opportunities in a courtyard kitchen are genuinely exciting. Because the space is contained, every design choice reads more intentionally. A bold tile choice on the counter, a painted accent wall, a small herb garden mounted at eye level these details feel curated and considered in a compact space in a way they simply don’t in a larger open yard.
- Keep the color palette tight two or three complementary tones maximum to avoid visual clutter in a small space
- Use vertical tongue and groove cedar panels on the back wall for a finished look that costs about $2 per square foot
- Mount a small chalkboard or magnetic spice rack on the side wall to add function and personality
What is the one thing holding you back from starting your dream backyard kitchen right now budget, time, or just not knowing where to begin?
16. Low Cost Outdoor Kitchen Makeover Using Paint Tile and Creativity
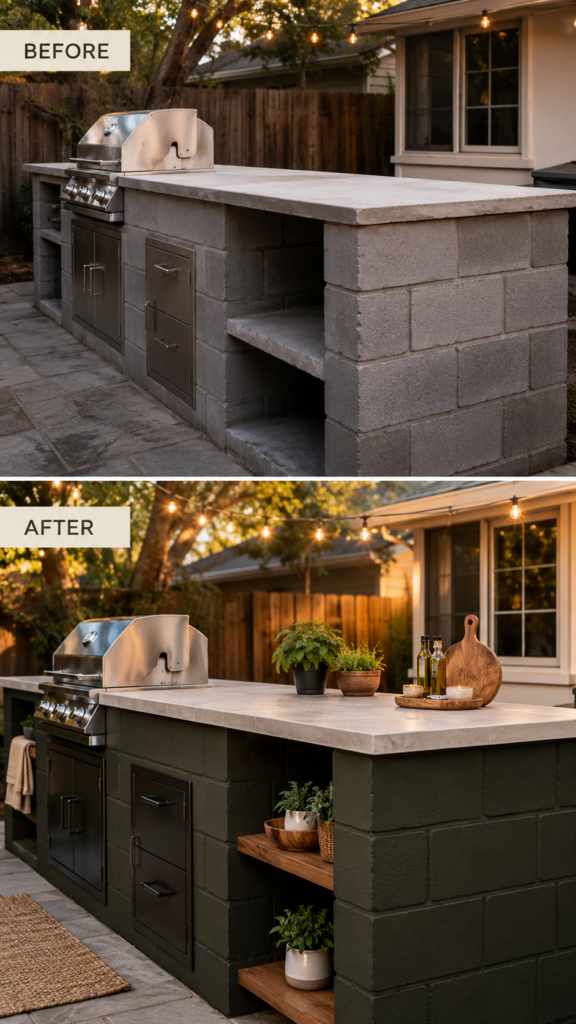
Sometimes the most budget-friendly outdoor kitchen project isn’t building something new it’s transforming something that already exists. An older concrete block structure, a dated brick grill surround, or even a plain wooden potting station can be completely reborn with the right combination of paint, tile, and a few carefully chosen accessories. This is the outdoor kitchen makeover approach and it is wildly underutilized by American homeowners.
Paint alone does more heavy lifting than most people realize. A coat of high-quality exterior masonry paint in a modern color think warm white, charcoal gray, or deep olive green instantly updates any outdoor structure regardless of what it’s made from. I once watched a homeowner in Charlotte spend $45 on a gallon of exterior paint and turn a crumbling 1990s brick grill station into something that looked genuinely current and intentional.
Layering tile over an existing countertop surface is equally powerful. You don’t need to demo anything. Clean the surface, apply cement board if needed, and tile directly over what’s already there. Add new stainless steel hardware, hang a few open shelves, drop in some potted herbs, and string lights overhead. The total spend for a full makeover like this routinely lands between $100 and $300 and the before and after difference is nothing short of remarkable.
Your 2 Minute Decision Map
By Budget
Starter Builds — Under $300
- Tight on cash? Go cinder block or pallet wood first
- Repurpose a potting bench for a no-construction weekend win
- Tile countertop over an existing surface — minimal spend, maximum impact
- Portable grill station on wheels if you rent or move frequently
Investment Builds — $300 to $500
- Cedar wood frame with a concrete countertop for a long-term backyard centerpiece
- L-shaped layout with a mini fridge if you entertain regularly
- Pergola roof addition when you want the space to feel truly finished and defined
By Lifestyle
Weekend Grillers and Busy Families
- Portable grill station — easy to move, easy to clean, zero commitment
- Modular IKEA cabinet setup — familiar assembly, fast build, very family-friendly
- Freestanding BBQ station with built-in storage — everything in one place, no hunting for tools
Entertaining Hosts and Outdoor Living Lovers
- L-shaped or courtyard kitchen — maximum counter space for prep and serving
- Pergola roof build — creates an atmosphere that makes guests never want to leave
- Cedar wood kitchen with open shelving — styled, warm, and genuinely impressive at dinner parties
Frequently Asked Questions About Outdoor Kitchen DIY on a Budget
How much does it cost to build a DIY outdoor kitchen on a budget?
The average cost runs between $200 and $800 depending on materials and size. Cinder block and pallet builds sit at the lower end while cedar and modular setups push toward the higher range.
What is the cheapest material to use for an outdoor kitchen?
Cinder blocks are your most affordable structural option at roughly $1.50 to $2.50 per block. Pair them with a tile countertop and you have a complete kitchen for under $300.
Can I build an outdoor kitchen without any construction experience?
Yes, and easier than you think. A potting bench conversion or portable grill station requires zero construction skills and can be completed in a single afternoon.
How do I protect my DIY outdoor kitchen from weather damage?
Seal all wood surfaces with exterior-grade waterproof sealer and apply masonry sealer to any concrete or cinder block structure. Reapply annually before your rainy season hits.
Is a permanent or portable outdoor kitchen better for small backyards?
Portable wins in tight spaces every time. It gives you flexibility to reconfigure your yard for different occasions and protects your investment by moving it under cover during harsh weather.
Conclusion
Your dream backyard kitchen is closer than you think and it does not require a second mortgage or a contractor’s business card to get there. I’ve seen $300 cinder block builds stop guests in their tracks and $150 potting bench makeovers become the most-talked-about feature of a home. Your outdoor space deserves to work as hard as the rest of your home, and now you have 16 real, tested, budget-friendly ways to make that happen. Pick one idea that excites you, price out the materials this weekend, and take that first step even if it’s just clearing the corner of your patio where the kitchen will eventually live.
So tell me which of these 16 ideas are you planning to tackle first, and what’s your total budget looking like?